Showing posts with label refin. Show all posts

SOLD!!: 1976 Fender Precision Bass, Olympic White

The mid-70s Fender Precision bass in Olympic White with a black pickguard was the weapon of choice for the one and only Dee Dee Ramone - I remember seeing the Ramone's countless times in New Jersey and New York - and Dee Dee had as many as three identical Olympic White P-basses lined up and ready to rock - along with a couple of big old Ampeg SVT rigs.


And despite their ash bodies - you can see that Dee Dee was pretty agile even with those P-basses around his neck!


The bass I'm selling was assembled over several years as parts came my way and I had some time between other projects - and has turned out as an exceptional example of this 70s rock workhorse.

I originally acquired the neck as a project piece that had been defretted and had the fret slots filled with Bondo. I found the body a little later on Ebay - it had numerous refinishes capped with a horrendous blue spray can paint job on it and an added rout for a Jazz Bass pickup and an extra pot.

I refinished the fretboard,refretted the neck, stripped the body, plugged the added rout and began a refinish. A few pictures from this initial work are below. The router table pin marks, the ground wire rout under the bridge, the hand rest and bridge position, and the wiring rout for the pickup all identify this body as being from between 1974 and 1977.


I went as far as priming and putting a coat of Olympic white on the body, but then put aside the project for a few years.


Recently, I revisited the project and realized I had most of the parts I needed - including a 70s Fender bridge, a 1976 P-bass pickup, the bridge and pickup covers, and a complete set of late 70s Schaller-made Fender bass tuners. I hadn't plugged a small rout for an added control pot, so I plugged that and then reprimed the body.

For the finish - I applied a straight white nitro base coat, followed by a cream-tinted white coat, to replicate the aging of the color coat on 70s Olympic White Fenders. This was then followed by a few clear coats to protect the color coats. This will cause the finish to wear slightly differently than a typical 60s Olympic White Fender, where most of the yellowing happens in the clear coat. Note how the yellowed Olympic White contrasts with a plain white piece of paper!


Also note that the Jazz bass routing repair is invisible - I expect since this repair was done several years ago it will stay fairly invisible.


My observation is that the 70s polyester finishes weren't even clear coated - the yellowing happens in the top part of the actual color coat. I'd love to know if this is what others have observed as well ??

But even if that is true, this body will wear differently due to the thinner nitro finish, as opposed to the thick polyester finish that would have been applied at the factory.

The bass fit together beautifully - with a good tight neck pocket fit. Once it was set up, the frets did need some dressing here and there, but the neck flattened out almost perfectly once the truss rod was tensioned up. The neck now has about 1/64 inch of relief around 10th fret - with near perfect intonation and fairly low action.

The pickup sounds a little brighter than the pickup in my 1970 P-bass, but has the classic grey-bottom pickup sound. The pickup resistance was a little over 11K Ohms. Note that the original grounding plate and weather-stripping material "pads" are in place as well.


The tuners are correct for 1976, though I do believe that some early 1976 P-basses came with the Fender produced tuners before the switch to the Schaller-manufactured tuners later in the year. The tuners were acquired from two different sources - two of them are in near mint condition and two of them were heavily machine polished to the point where the plating is gone from the top of one of the string pegs. The ferrules in the neck are new, as is the nut.

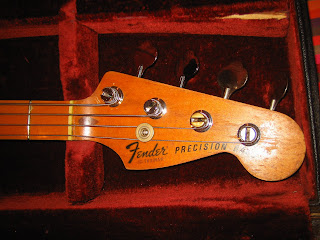


The bridge is an original 70s Fender bridge in excellent condition, with the crease visible on the string anchor portion of the neck.


Finally, the bass comes in a rare brown-burgundy lined original Fender hardshell case. The brown-burgundy lining was used only during the 1975/1976 era - most cases were lined with the familiar orange material. The case is in excellent condition as is the exterior Fender logo.


The inside of the bridge and pickup covers bear remnants of what appear to be red or burgundy ink inspection stamps - very faint.


Ready to rock in front of my beloved Ampeg B-15N !!


The following parts are not original 70s Fender parts:
- 3-ply black-white-black pickguard
- black thumbrest
- new CTS pots, capacitor, jack and knobs
- pickguard screws, neck screws and bridge screws

All in all a really nice bass that plays great, with near-perfect intonation and low action - with a total weight just under 9 lbs with the covers on - not bad for a 70s Precision; this isn't one of the late 70s "boat anchor" Precisions (I have one of those coming up for sale soon though !!).

UPDATE: SOLD! Thanks to Eoin of the Emerald Isle - hope you enjoy the bass !!
read more →

1966 Fender Jazzmaster: Aged Olympic White

<
A fairly straightforward project here - a 1966 Fender Jazzmaster body that had been poorly refinished over the years and that the owner wanted to do in an aged Olympic White finish.

The original Olympic White is a color thats seldom seen - its a bright white color that has a slightly bluish and very very slight grey tint to it - which makes it look like a fairly harsh white. However, the vast majority of Olympic White Fenders had a nitro clearcoat, or in later years were sprayed in a polyurethane finish - both of which aged the Olympic White to a buttery yellowish color.

The only truly Olympic White instrument I've seen in person was an early Jazzmaster - probably from 1960- 62, which hadn't been given a clear topcoat, and was therefore still a brilliant white color. And yes I remember my buddy Rod selling it at a guitar show for $800 ... which was a decent price back then .. I'm not sure you can even get a Japanese reissue for that price these days !!!

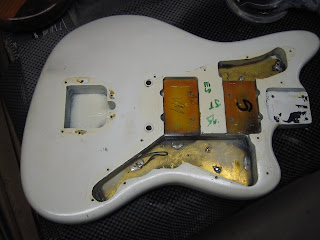
So this project came to me with a worn flat white finish - which was over the remnants of a black finish - which actually looked like black automotive primer. The guitar obviously had been sunburst originally, but had been stripped before getting its "excellent" refinish. Note the "S" scrawled in the neck pickup cavity for "sunburst" - and the "ES" stamp under the finish between the pickup routes. My post on a 1966 Mustang explains the meaning of the ES stamp.


Fortunately, the finish sanded off very easily and fairly cleanly. I did notice that the grain of the alder body was visible through the poorly done refinish - probably meaning that body had been stripped with steel wool at some point, which has the effect of revealing the grain, since the softer parts of the wood get worn away by the steel wool. Meant the body would require a good sealing and maybe a few primer coats to get a smooth finish.


The body did come out fairly clean - clean enough that redoing the original sunburst would have been an option, but the owner was set on Olympic White. Notice the remnants of the original yellow stain on the back of the body.


Re-dying the body yellow was the first step - followed by several applications of Behlen's clear vinyl sealer, which is very similar to the Fullerplast vinyl sealer that was used by Fender.


After a light sanding, a coat of white nitro primer was applied. The grain was still visible at this stage, so after wetsanding a second primer coat was applied and wet sanded. This appeared to completely fill and level the rear surface of the body, making it ready for the gloss white color coat.

The color coat went on smoothly, since the body had been extensively prepped by this time. Two color coats were applied - with a light sanding inbetween to smooth out any overspray.


I wanted to keep the overall finish as thin as possible, but this was going to be a challenge since I'd already applied two primer coats and the tinting of the overcoat would require at least 4 or 5 clear coats - so as soon as the color coat looked good, I applied a thin clear coat to seal it in and protect it.

I then got the tinted clear coat ready - which I wanted to do in as few passes as possible but still have an even tinting. I decided to use a tinting mix that I had used the day before on a 68 Telecaster refinish - but to cut it slightly with more clear lacquer and a little more acetone (as thinner) than usual.

I sprayed a test patch on a piece of white masonite and set my spray gun for a fairly wide pattern, at a low pressure, with a moderately heavy coat but more thinned than usual lacquer.

As I started spraying - I resisted the impulse to try to build up color quickly, instead building up evenly over several passes. The color came out very even and had exactly the look I wanted - not as yellowed as some 60s Fenders I'd seen, but a nice subtle buttery color.


Two further coats of clear nitro were then applied, to lock in the ambered clear coat. After these had dried for roughly a week and a half, I carefully wet sanded and then buffed out the body - to result in what looks like an aged Olympic White finish.


Once the owner re-assembles the guitar, I will post pictures of the complete instrument.
read more →

Musicmaster Disaster !! Another Daphne Blue Fender Bass

Here's an example of a rebuild project that honestly doesn't make a whole lot of sense in terms of "effort" vs. "value" - but what the hell. Its fulfilling to take an instrument someone has managed to destroy and bring it back to not only being functional but also looking good.

This project started off with an early 70s (71 to 73) Musicmaster Bass body that I got on Ebay. The body is made of poplar, as most of the early Musicmasters were, and had not only been very roughly routed out for a number of different pickups, but also apparently had been cracked in half at some point and then poorly reglued such that the body was no longer flat !! The good part was the body only cost $10 plus shipping .. because no one else bid on it.

So the first step was to REBREAK the body along the glue line - then reglue it while it was clamped flat. I clamped a maple board on each side of the break - parallel to the glue line - then put the body on the edge of my workbench - and hit the body with a mallet on the side that was overhanging such that the body split evenly.

Then I reglued the body - though there were some gaps from wood splintering - and clamped it flat. I used a liberal amount of Titebond to glue it all together.

I set the body aside then - until I randomly found a defretted early Musicmaster neck on the Denver Craigslist that was reasonably priced.


Finding the neck motivated me to restart the project. I then started the filling in process. As I said, there were gaps along the new glue seam, which I filled in with long splinters of poplar. At least the body was solid and flat now.

Next came filling in the routings - which as you can see were crudely done. I routed out the areas to slightly less than 3/4 inch, so that I could use regular 3/4 inch stock poplar to plug the body.

As you can see I routed out the body in 3 areas - one triangular area near the bridge, one rectangular area towards the neck and a large area below the stock pickup routing.


This picture has the three poplar block placed but not yet glued in position. Note that I cut the block so that the grain was in the same direction as the rest of the body - not sure that really matters on a rebuild of this magnitude!


I glued and clamped in the three poplar blocks plus some smaller pieces at the edges of the control routing and some small filler pieces here and there - the goal was to minimize how much filler I'd have to use.


Once everything was dried - I went around the gaps and used a two part plumbers epoxy as a filler for gaps. The plumbers putty doesn't shrink and has the consistency of plasticine or fimo. It is very dense but works great for filling in limited areas and is actually drillable.

Sanding everything down with a random orbital sander and a 100 grit pad brought all the filled in areas down to the level of the surface. Then a sanding with a 220 grit pad gave the front and back of the body a nice finish. Some block and hand sanding prepped the edges of the body for sealing.


I used the usual vinyl sealer on the body - spraying several heavy coats to seal the somewhat porous poplar body. I wet sanded with 320 grit paper between coats. Though the plugs are prominent, the body was really starting to shape up.


Because most if not all of the 70s Musicmasters didn't have a primer coat - I decided to move right to color coats after the sealer coats. I applied the Daphne Blue heavily, since it would be acting as a primer in effect. Once the first color coat was on, I sanded the body again, to reveal some high spots - in the process removing most of the blue finish on the front of the body - much as I would have with an initial white primer coat.


I then sprayed a few more coats, now that the body surfaces were really getting flat and smooth. The Daphne Blue really started to look good.


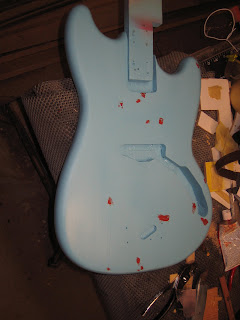
The next step was to look for all the little dings and spot flaws and apply Bondo glazing putty to fill these small imperfections.
Those red spots will be wet sanded and then a few more color coats will be applied - and a clear coat - and then I'll begin on the neck !


read more →

To my International Readers - Interest in Guitar Refin Services ??

I have noticed that a good chunk of the visitors to my blog are from Europe and Australia - as well as a smattering from Japan, South America, India, the Ukraine, etc., etc.

I am able to see the country and city most visitors are connecting from via EWebCounter - a freebie service that runs the counter on my webpage and also keeps a running tally of country by country visits to my blog. Pretty nifty, though I do admit it also brings home the "Big Brother" possibilities of the internet ... I am a big fan of George Orwell's cautionary tales.

Anyway - I digress - my question to international readers is - would you consider using my refinishing services if I could keep the shipping costs down and promise a consistent turn around time ?

Here are a few points to consider, using a Fender Precision body as an example:

- shipping cost, without any hardware, from the USA to western europe is around $40 US (33 Euros); the shipping cost from Europe to me probably varies by country, but I'd estimate that the roundtrip cost would be around $100 US.

- shipping time seems to be on the order of 1 week each way, so a roundtrip time of 2 weeks, plus of course the time for me to do a refinish

- customs duty: I will have to look into this, but there should be no customs duty either way since no merchandise is actually changing hands - probably some special forms I'd need to provide and fill out. This can be a significant point since the duty is on the order of 25% for most of europe.

- my pricing for refinishing and repair is the same regardless of where you are from, so for a Fender body that would typically run from $200 to $300 US.

So the bottom line is that a refin of a Fender Precision body for a customer in say Norway would cost around $300 to $400 and take about 6 to 8 weeks. I'm not sure how available nitro refins are in most of Europe, but I'd guess with the cost of labor and weakness of the dollar my prices would be lower. And I have access to all those nice custom colors.

I welcome feedback - either through the comments function - or via email directly at:
repairs@bostonguitarrepair.com

Thanks !!
read more →

1971 Fender Precision Bass Refinish in Sonic Blue !!!

Another Fender Precision Bass project - an older maple board P-bass that has been through some changes, namely, the body has the classic added Jazz bass pickup at the bridge route, plus a route to sink a BadAss 1 bridge into the top and of course, a route for an added control pot or two. The body was also refinished in a metallic sparkle red - pretty nice job actually, but not what the owner wanted. The bass had been sold as a 1971/72 Precision, but the current owner wasn't certain of the originality of the body.

After some the decision was made to refinish the bass in one of the custom colors still available in 1971 - a number of Fender's classic custom colors were dropped after 1969 for the P-bass - but a few remained, such as Candy Apple Red, Lake Placid Blue, Olympic White, Black, Shoreline Gold, Shoreline Silver and Sonic Blue.

Digging through my paint collection, I discovered that the PPG Sonic Blue acrylic lacquer I had mixed by Kwik Autobody of Medford - about 13 years ago!!! - was still in excellent condition. Here's to quality packaging. After showing the owner a paint stick of the Sonic Blue, he decided that Sonic Blue with a white pickguard would be a very cool, retro looking combination.

But before spending the money on a complete refinish, we decided to confirm that the body was in fact of the correct vintage. To do this, I sanded the finish in two areas on the back of the body: one on the centerline near the butt end of the body and one between the centerline and bass-side cutaway. This revealed the two distinctive doweled pin marks that are on Fender P-bass bodies from between 1967 and the mid-70s. Combined with the bridge position and the lack of a route from the pickup to the control cavity, I confirmed that the body did match the neck, which was dated Dec 1971.

The first task was to remove the existing finish, and see what I had to work with underneath - I also was concerned that the 80s looking finish would be some polyurethane or polyester finish that would be impossible to get off. But a few hours later, courtesy of some zip strip, plastic scrapers, stripping pads and my random orbital sander, I had the majority of the finish off the entire body.


The came the task of filling in the extra routes before starting the refin process.

I cut a piece of hard douglas fir (aka "pumpkin pine" - a popular material for flooring) the a thickness that matched the depth of the bridge "sink" - and then cut it to shape so it would fit into the squared off hole exactly.

For the jazz bass route, I first cut a piece of alder block to fill the cavity, using split hardwood dowels to fill in to screw reliefs - and then routed a shallow (1/8th inch) rectangle so that I could cover up the repair with a smooth even piece of douglas fir, as with the bridge sink.

For the control cavity route, I simply cut and shaped a block of fir to fit into the route and glued it securely in - I wasn't as worried about hiding that route since it was going to be under the pickguard.


Once the blocks were glued in - and had dried and any small gaps were filled with wood shavings or minimal wood filler - the body was sanded down to prep it for staining, as would have been done by Fender. There were a few slight remnants of yellow stain on the guitar body, even after all the refinishes and sanding and stripping.


The yellow does show where some of the staining from the brown undercoat that had previously been on the guitar still was showing. Even without the extra routes, this body would not have been a good candidate for a Fender 3-color sunburst refin.


Following the staining - several vinyl sealer coats were sprayed on, to seal the grain and prepare the body for primer and paint. The vinyl sealer coat is more or less the same as the Fullerplast material Fender used throughout the later 50s, the 60s and into the early 70's until the thick "poly" finishes came about. Both sunburst and custom color Fenders during that era would have had the yellow stain/Fullerplast treatment as an undercoat.


After a careful block sanding, the body was now ready for its white primer coat. An initial coat was sprayed, which revealed some dings and scratches and rough spots. A small amount of red glazing putty and liberal wet sanding was used to even out these areas and the filled-in routes. Then a second white primer coat was applied and wet sanded to prepare for a color coat.
I didn't take any pictures of the priming process - instead we will jump right to the first color coat!


As I said above - I found that the near vintage Sonic Blue lacquer I had was still in excellent condition - so I thinned it about 1 to 1 with regular lacquer thinner - and started spraying. I sprayed several coats on, without any sanding between - to build up a color base. The picture below is shortly after spraying - note that the finish is fairly "flat" - as it has not been wet sanded yet and I was spraying with a bit thicker paint and higher pressure to build up a good base.


This coat will be wet sanded, which will undoubtedly result in a few sand throughs to the primer, but then a second "wet" color coat will be all the color needed. I expect to finish the color coats and have a clear coat on the bass by the end of this week - check back then. This will deepen and strengthen the blue in this finish.


(Update May 16th, 2008)

I have completed the bass - it took a few extra color coats on the front of the bass to get the routing fills level with the rest of the surface, but after a few untinted clear coats, the bass was ready for wet sanding and then buffing.


The electronics were then switched to a new white pickguard, which is appropriate for a 1971 custom color P-bass, as opposed to the reissue tortoise shell guard that was on it. A little soldering, and the bass was finished and strung up. A Fender-style bridge replaces the BadAss bridge that was on the bass - which required setting the action and intonation.


This color has a very cool look to it and it will probably start to look a lot like surf green as the clear topcoat yellows in a few years.


read more →