
Last spring, while in the middle of creating some small concrete countertops for a tattoo shop build-out (Pumpkin Tattoo in Jamaica Plain) the question came up, "would it be possible to build a concrete body for a guitar"?
I decided to give it a shot as I've always been interested in alternate materials for guitars (fiberglass, acrylic plastic, aluminum) and I thought visually it might be cool.
I selected a simple but classic body shape - the 1959 Gibson Les Paul Junior double-cutaway - but decided to make a 30-inch scale length bass instead of a guitar. I used my own '59 LP Junior for a tracing.
Molding the basic shape didn't seem too challenging, but I was a little concerned about how to cast in the pickup and control cavities, neck pocket, as well as conduits for the wiring. I also knew I wanted to add in some metal mesh and rods for reinforcement, since I was worried about the whole body cracking if it took a hard blow.
I borrowed a book entitled, "Concrete Countertops" by Fu-Teng Cheng as a guide - and it was very helpful.
To start with, I cut out the body profile from 1 inch thick pine - then traced it onto a some 3/4 in. pine to get a full 1 3/4 inch deep mold - the same as a 50s Les Paul Junior. I decided to "borrow" a spare Dan Armstrong bass neck I had for the prototype body and used this to layout a neck-pocket.

The mold is an open top mold - with the top of the guitar body facing downwards, so that it would end up with a smoother cast finish. I used melamine bookshelves for the base of the mold. I intentionally left a middle seam as I thought this would make the finished body look more like a poured building wall - more of an "industrial" look.
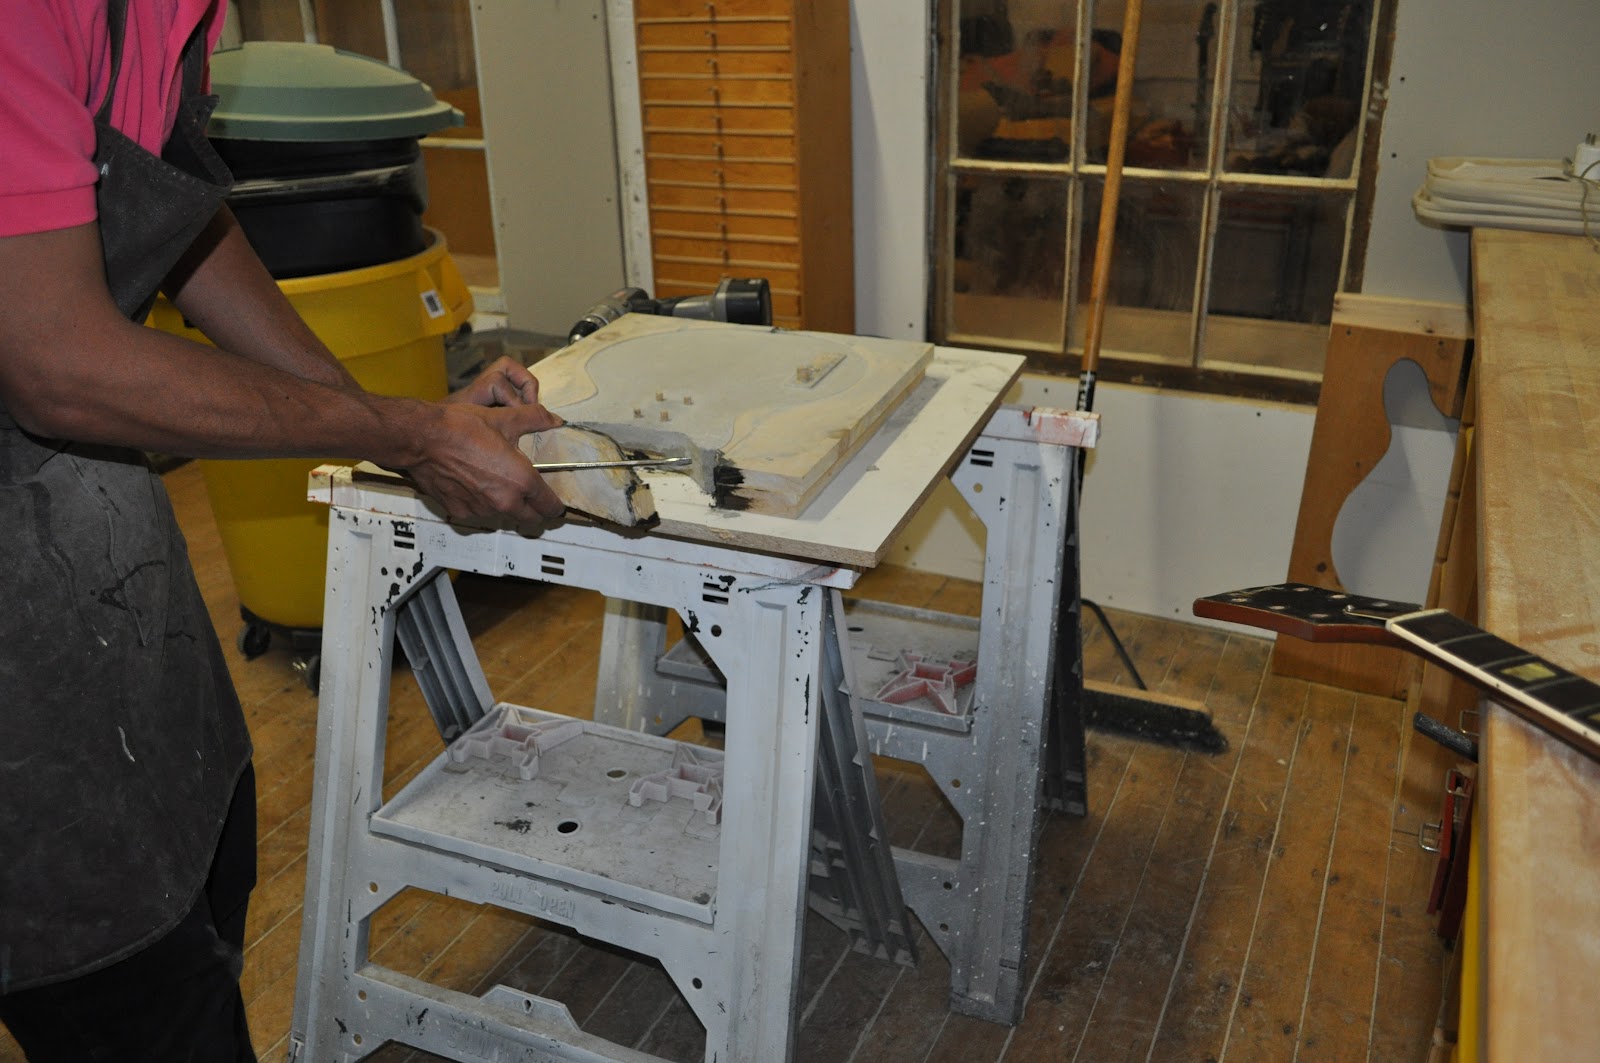
I placed wooden blocks for the neck pocket and pickup cavity. The grey material is epoxy that was used to fill in some chips and rough spots in the somewhat crudely cut form (I used a jigsaw because my bandsaw wasn't operating correctly)

I also needed to cast in the holes for the bolts that would hold the Dan Armstrong neck to the body. I drilled holes for dowels in the neck block - using the Armstrong neck as a template and checking the placement against it

I built a similar block for the control cavity, with dowels through the melamine backing board for the control pot shafts and output jack.
I put a piece of three conductor wrapped wiring (yellow) to be cast into the body, to carry the signal from the pickup to the controls. I also added a short piece of shielded wiring from the pickup cavity to the bridge location to act as a bridge ground wire.
For reinforcement of the concrete, I placed two pieces of aluminum mesh as well as a piece of hollow steel tubing (a cut-off piece of IKEA curtain rod) under the neck pocket.


I should also point out that the body mold was cut into three segments - which were then screwed down to the backplate after being sealed with some regular black silicone caulk. I also put a layer of paste wax on the insides of the form and all of the wooden blocks that would be removed from the cast body.
Now I was ready to pour !!
For the concrete, I used "topping mix" concrete - which has no aggregate (pebbles) in it and is very smooth - with a liquid vinyl additive to make the concrete less brittle and less likely to chip or crack. These were both standard off the shelf items at Home Depot.
I mixed the concrete a little wetter than perhaps called for in the instructions - but it poured well. I used a square pad sander with rough grit sandpaper on it to vibrate the edge of the form as a means of making sure there were no voids in the pour.
Below is the form with the concrete poured and vibrated and lightly troweled.

After the concrete had started to harden - and some water had risen to the surface, I screened to surface to smooth it as much as possible.

Then I simply put the mold aside and let it cure for roughly 4 days. It is important to let the concrete cure before attempting to demold it - but its also important to demold it in less than 7 days, as the concrete continues to harden and will become very difficult to drill and/or polish after 7 days.

The mold was disassembled and the edge pieces pulled away carefully.

The casting actually came out cleaner than I expected !!


Once the sides of the form were removed - I had to drive the wooden form out of the body to leave the control cavity.

The control cavity form halfway out of the body.

Then came the step of prying the body up from the backing board - it required more force than I expected and I was being cautious. Since then I have realized that the body is nearly indestructible and I was probably a little over cautious!


And "voila!" - there it is !!

Here's the body free of the mold - with the ground wire and three conductor wiring visible.

The next step was to file off some of the rough edges and I actually sanded the back a little - but opted NOT to use a concrete grinder/polisher as I wanted to keep the raw concrete look of the body.
I brushed on a few coats of concrete sealer to the body - per instructions from the concrete countertops book. I followed the sealer several layers of paste wax - which I let dry and then wiped off thoroughly, to try to give a little bit of a sheen to the surface
I used a small hammer drill for pickup and bridge mounting holes, which I then filled with grey plumber's epoxy, before redrilling them for the actual mounting screws. This was a much easier approach than trying to use masonry screws.

I began to assemble and wire the components.


Here are some pictures of the completed concrete bass - it weighs approximately 25 lbs complete - but to be honest it actually feels HEAVIER !! The sound is pretty neutral - shaped more by the GFS-made "Musicman"-style bass humbucker than anything else. I eventually will replace the neck with a slightly wider fretboard neck (which I will make) so that the Dan Armstrong neck can go back to its rightful place.


Based on my experience building this body, I plan on building one or more follow-ons with the following changes to lower the weight:
- reduce the overall thickness to 1 1/2 inches from 1 3/4 inches (which should shave about 3 lbs off)
- place some foam blocks inside the casting, between the bridge and butt of the body and on the bass side of the bridge (could reduce the weight another 3 or 4 lbs).
I also would like to make a guitar version - both with a wooden neck and with an aluminum neck.


Beuatiful work
ReplyDeletetiring to play?
ReplyDeleteAnd I thought my friend's 8-string was heavy! That is frickin' AWESOME!
ReplyDeleteMaybe you can cast the concrete body with a styrofoam core inside the mold. The idea is to obtain a foam body with a concrete skin. My guess is you wouldn't need metal reinforcements with such a core. It would be major effort to design and make the mold, but seeing your other jobs you may be up to the task!
ReplyDeleteCongratulations for your work(and letting us see how too) , as you revive guitars in sometimes very sorry state.