I finished this project roughly 5 years ago - but I think its an interesting one as it demonstrates a pretty extreme headstock repair and also inlaying wood into a top to repair "artistic" carving.
The subject was a 1971 Gibson EB-3 bass, with the infamously delicate slotted headstock. I bought this bass as a project on Ebay for something along the lines of $90, partially as a potential project and partially for the included "mudbucker" pickup and bridge, which I wanted for a 1969 EB-0 I was also working on. The bass also had 3 of the 4 tuners and the original knobs - so I was going to have to figure something out or find another tuner somewhere.
The reason the bass was so cheap was the complete decapitation of the bass - the headstock was included, but several chunks of wood from right behind the nut were completely missing - so there was about a 1/2 inch gap of NOTHING between the headstock and neck. In addition, someone had gone a little crazy with their Dremel tool and carved flowers, Guild S-100 style, into the front of the body. On the plus side, the heel was solid and the fretboard appeared to be in good shape too. The bridge position mini-bass humbucker was also included, but it was missing all four polepieces ?? Where did they go ???
Given that I had gotten my money's worth out of the bass with the parts I needed - I figured I had nothing to lose on this bass - except for maybe a lot of time. I decided to fix the headstock as best I could, inlay wood into the front of the body to replace the carving, fit the bass with a 90s Thunderbird pickup in the neck position and the baby humbucker in the bridge position if I could fix it, and then paint the whole thing white in the style of an Polaris White mid-60s SG Special.

I started by routing the carved area of the body a 1/4 deep - so that I could fit in a mahogany patch. I also used a file to even out the edges of the headstock break, and then cut and carved a piece of mahogany that I could place diagonally to fill the gap. I used a protractor to mark and cut a piece of cardboard to make sure I ended up with the proper back angle on the headstock, and marked lines on the face of the headstock to give me something to align the headstock with the neck. I then Titebond'd and clamped everything together - trying to maintain the alignment as I did.
Once the headstock had dried and it appeared aligned - I drilled through the joint, and placed five small maple dowels, liberally glued - across the joints to give them additional strength and stiffness. Sadly I didn't take pictures of this part of the process - the joint looked very strange - with an untrimmed block of mahogany with a bunch small dowels sticking out of the front and back of the area around the nut.

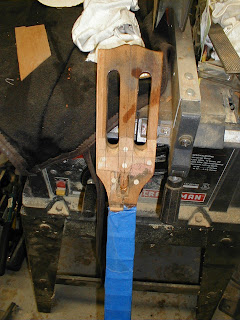


I then trimmed down the dowels and carved the added mahogany to match the profile of the neck and added the typical 70s "volute" behind the nut. The two pictures show the joint after the shaping - with the lighter colored added mahogany and dowels clearly visible. A few more pictures of the bass back together in one piece, patches and all.
Now came the work of filling in the grain - sanding the whole thing smooth - and spraying the first coat of a clean white nitro finish - to resurrect this poor old bass. Amazing how much better it looked after the first few coats of white !!

I started getting together the hardware - making a pickguard and backplate from 3-ply material, and a neck humbucker surround from black plexiglas. I was able to find 4 steel threaded inserts at my local hardware store that amazingly threaded right into the baby-hucker - returning it to full function. A recent Gibson selector switch substituted for the Variatone, and a set of new pots and jack to complete the electronics.FInally, I carved a new nut from some fake bone material.


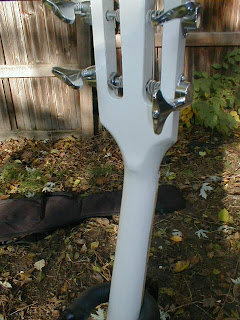
I applied a few more coats of white before wet sanding the finish smooth. Then I carefully masked the headstock (tricky with the slots for the tuners!) and sprayed the face black. The logo had been a pearl logo glued to the face of the headstock - only 1/2 of it was present when I got the bass, so I decided to skip the logo entirely. Maybe one day I'll find one and glue it on or apply a decal.. not the biggest concern on this hot-rod EB !!
Finally - I buffed out and polished the finish - and assembled the parts - and wired her up. I had to kind of jerry-rig a schaller tuner for the missing Gibson tuner, but it fit well enough with a little drilling and looked pretty good. The black pickup, headstock face, pickguard, and chromed bridge and pickups combined to give this bass a very sharp look - later I saw that Gibson used a similar look on their "SG Bass" reissue !!
The most impressive thing - besides the fact that the neck was dead straight and the thing held tune - was that the 90s Thunderbird pickup in the neck position sounded AWESOME !! - and combined with the bridge pickup with the switch in the middle position, this bass is a great sounding instrument - more like a T-bird than an EB-3 !!


This bass now belongs to my brother Raj, in Red Bank NJ - as he is the king of the EB-0/EB-3 family - in fact, he used to play in a Cream tribute band - called, of course - Cremora !!! (the cheezy cream substitute??)
read more →
Yet another project - one of my favorite types of instruments to work on - maybe because there are so many abused examples out there ?
This is a late 60's Gibson EB-3 bass - structurally very similar to a 68/69 EB-0 I recently finished and sold on Ebay, but thats been through some trials and mods over the years.

The mods are minor and reversible - notably, the bridge position mini-humbucker was replaced with a Rickenbacker "toaster" pickup from a '67 Rick 4005 bass - as were all the electronics and knobs. This was actually one of the primary motivations for me to acquire this bass - I coincidentally have a mid-60s Rick 4005 bass in pieces - missing the electronics and one pickup - lost pieces eventually recirculate to their rightful places - perhaps I have stumbled upon a very material expression of the eastern concept of karma - "guitarma ??"
The main "trial" this bass has been through - besides having its cherry finish stripped - is that like many Gibsons, it suffered a headstock break. Apparently this was repaired by laminating a 1/8" thick piece of mahogany on the back of the headstock. Also, the Gibson logo was removed and replaced with an approximation in mother of pearl and there was an extra hole to fill in the front of the body for the added Rickenbacker "blend" knob.

The bass also had a replacement metal (steel?) pickguard and control panel cover and a chromed finger rest.
On the plus side - the bass had the original neck humbucker, bridge, mute assembly, tuners and hard shell case - and outside of two finger wear spots on the front of the bass and the extra control hole, the body was in excellent condition. I have the correct Pat # baby humbucker for the bridge position, repro knobs and will make a new pickguard, backplate and thumbrest.
The two parts I dont have are the brass control cavity shield and the 4-position Variatone switch. But I'll keep looking or simply install an SG-style toggle.
The first step after disassembly was to take down the headstock to the proper thickness on a belt sander - taking care not to make it uneven or TOO thin. I left the last little bit of the laminated piece on and used a sanding block to even everything out. Not surprisingly, there was no serial number remaining. I also had to recarve the neck to headstock transition - using my 65 EB-0 as a guide - not too tricky.

The headstock repair seemed very solid - no worries about it pulling apart - the laminated mahogany was an overkill type repair. And once everything was sanded down, there was nothing that a good solid color refin wouldn't cover up ! And I am very fond of Pelham Blue.
I plugged the control with a mahogany plug and then used some nitro based scratch filler on the deeper of the two wear marks and the control plug. This view is BEFORE sanding.

The body and neck were completely sanded and then grain filler was slopped on - and allowed to partly dry before I scrubbed off the excess. After drying overnight, I sanded the entire bass down again - using a sanding block, a random orbital sander and plain old sandpaper. I then sealed the filler with a good heavy coat of clear nitro sanding sealer - and the grain really "popped" after this treatment. I almost felt bad about covering that gorgeous wood up with blue paint ...


This is what a piece of mahogany with the grain properly filled should look like - notice that there is no filler on the surface of the wood - only in the grain, so that once a clear coat is applied, the wood has a mirror finish that still emphasizes the grain of the mahogany.
I used my Pelham Blue Melodymaker as a guide on matching the color - since the MM is heavily yellowed, I had to look for places it was well worn to get an idea of the original color - which is a surprisingly bright metallic blue, that of course appears green after 40 years of the top coat yellowing. I'll try to post a few closeups of the MM later - but meanwhile, here is the EB-3 with the first few color coats on.


(added Oct. 24th, 10:30 am)
OK, here are a few pictures of the EB-3 compared to the original Pelham Blue finish, beat-to-hell Melodymaker guitar. Notice how the different light radically changes the appearance of the Pelham Blue - the pictures above were taken under my shop neon lights - the ones below were taken under low-power halogens.
The first picture is a close-up of one area on the MM where the top coat has worn off and left some of the original finish exposed - compare this to the picture above and you will see how close the two metallic blues are.
This guitar was played to death - lots of mojo.

Then here is a pic of the EB-3 by itself (some parts just placed) and side by side with the MM. I'd have to do a lot of yellowing to match that color !!


( Updated Oct. 26th, 11:30 PM)
OK - so I touched up the Pelham Blue - looked pretty much perfect, and then began applying a yellowed/ambered topcoat to start getting the EB-3 towards the proper aged green look. A tricky proposition to get a nice even color - but I made a good start - Sunday I'll try a lighter tinted coat and try to even out the back and get the front a little bit greener - and do the back of the headstock too!
A pic of the front of the bass - and then a picture of the neck with yellowing and headstock without yellowing to show the contrast.

 read more →


