Showing posts with label 1966 Fender. Show all posts

SOLD!!: 66 Fender Jazz Bass, Lake Placid Blue


I have owned this bass for over a decade - I bought it from a guy in New Jersey, with the body completely stripped and clear coated but with an original Lake Placid Blue headstock. My plan all along was to restore it to its original finish - a couple of false tries and I put the bass away in pieces for nearly 10 years.

Finally, over the past few months, I pulled the bass out again and made a serious effort to give the body a refinish that would match the aged Lake Placid Blue headstock and restore the bass to its original appearance.


I used acrylic lacquer from TCP Global - who specialize in products for restoring vintage automobiles. Fender did use acrylic lacquer for custom colors from sometime around early 60s, when car manufacturers switched from older nitrocellulose based colors to acrylic lacquer.

Lake Placid Blue was originally a 1958 Cadillac color, but was no longer being used by GM by 1960 when Fender began using it as an optional custom color. When Fender switched to acrylic colors, new formulas were developed for the older automotive colors.

While I feel pretty confident that TCPs colors ARE accurate representations of the original nitrocellulose colors of the 1950s, I am not confident that the colors Fender used during the 60s were always accurate representations of the original 1950s colors.


So why is this whole discussion relevant ?

Well - when I initially tried refinishing the body of this 1966 Jazz Bass, it became obvious that the headstock was a lighter and more silvery blue color than the new Lake Placid Blue finish on the body - especially once I "aged" the clear coat by yellowing it.

I then pulled out my Pelham Blue (Gibson's 1960s metallic blue) lacquer - and began color blending - shooting test pieces of masonite and then applying a yellowed clear coat until I got a mix that looked like the headstock. The final mix was roughly 2 parts Lake Placid Blue to 1 part Pelham Blue.

Even though it may be hard to tell on a computer monitor and with different flash angles, these two pictures should show that the color ended up being a nearly perfect match after I carefully tinted the clear coat to get an "aged" effect.

The obvious difference is that lack of finish checking, chips and wear on the refinished body.  However, I used a very low plasticizer content nitro for the final clear coat, so the body should begin to check subtly within the next few months.

If the next owner plays this bass like it should be played, I'm sure in a few years it will be hard to tell it's a refinished body.

So now for the details on this bass.

Besides the body refinish, the parts on this instrument are close to 100% original. The exceptions to originality are the following:
- volume knob for neck pickup is a recent reissue
- the original tone pot froze and was replaced with an identical 1967 tone pot (the original pot is included)
- the original cloth-covered wiring in the control cavity has been spliced due to the wires being cut by a previous owner, and the ground wire to the control cavity shielding is new cloth covered wire
- the pickup cover is probably not original, but I honestly don't remember if it came with the bass or not
- there is a nitro overspray on the back of the neck but not the headstock or butt of the neck
- there is a small repair to the plastic of the original nut next to the slot for the g-string (see picture below)

Everything else - down to the screws for the pickguard and the thumbrest - is factory original to this instrument.  And it also comes in the original 1967 hardshell case, which is in very good condition.

This bass was actually shipped during early 1967 - I refer to it as a "1966" because of the Dec 1966 neck date.


However the pickups have handwritten dates of  "1-8-67" and "12-30-66" on them.  The neck and bridge pickups measure at around 6.8 K Ohms and 7.3 K ohms, respectively.


As you can see, I also masked off the area under the pickguard and controls so it is less "aged" than the rest of the finish - as an original finish would be.


The control pots date to the 13th week of 1966, with the exception of the replaced tone pot, which dates to 1967.

The pictures below show some of the details on this bass:
- the back of the original white pickguard, which has no cracks or chips
- the proper "paint stick" mark in the neck pocket
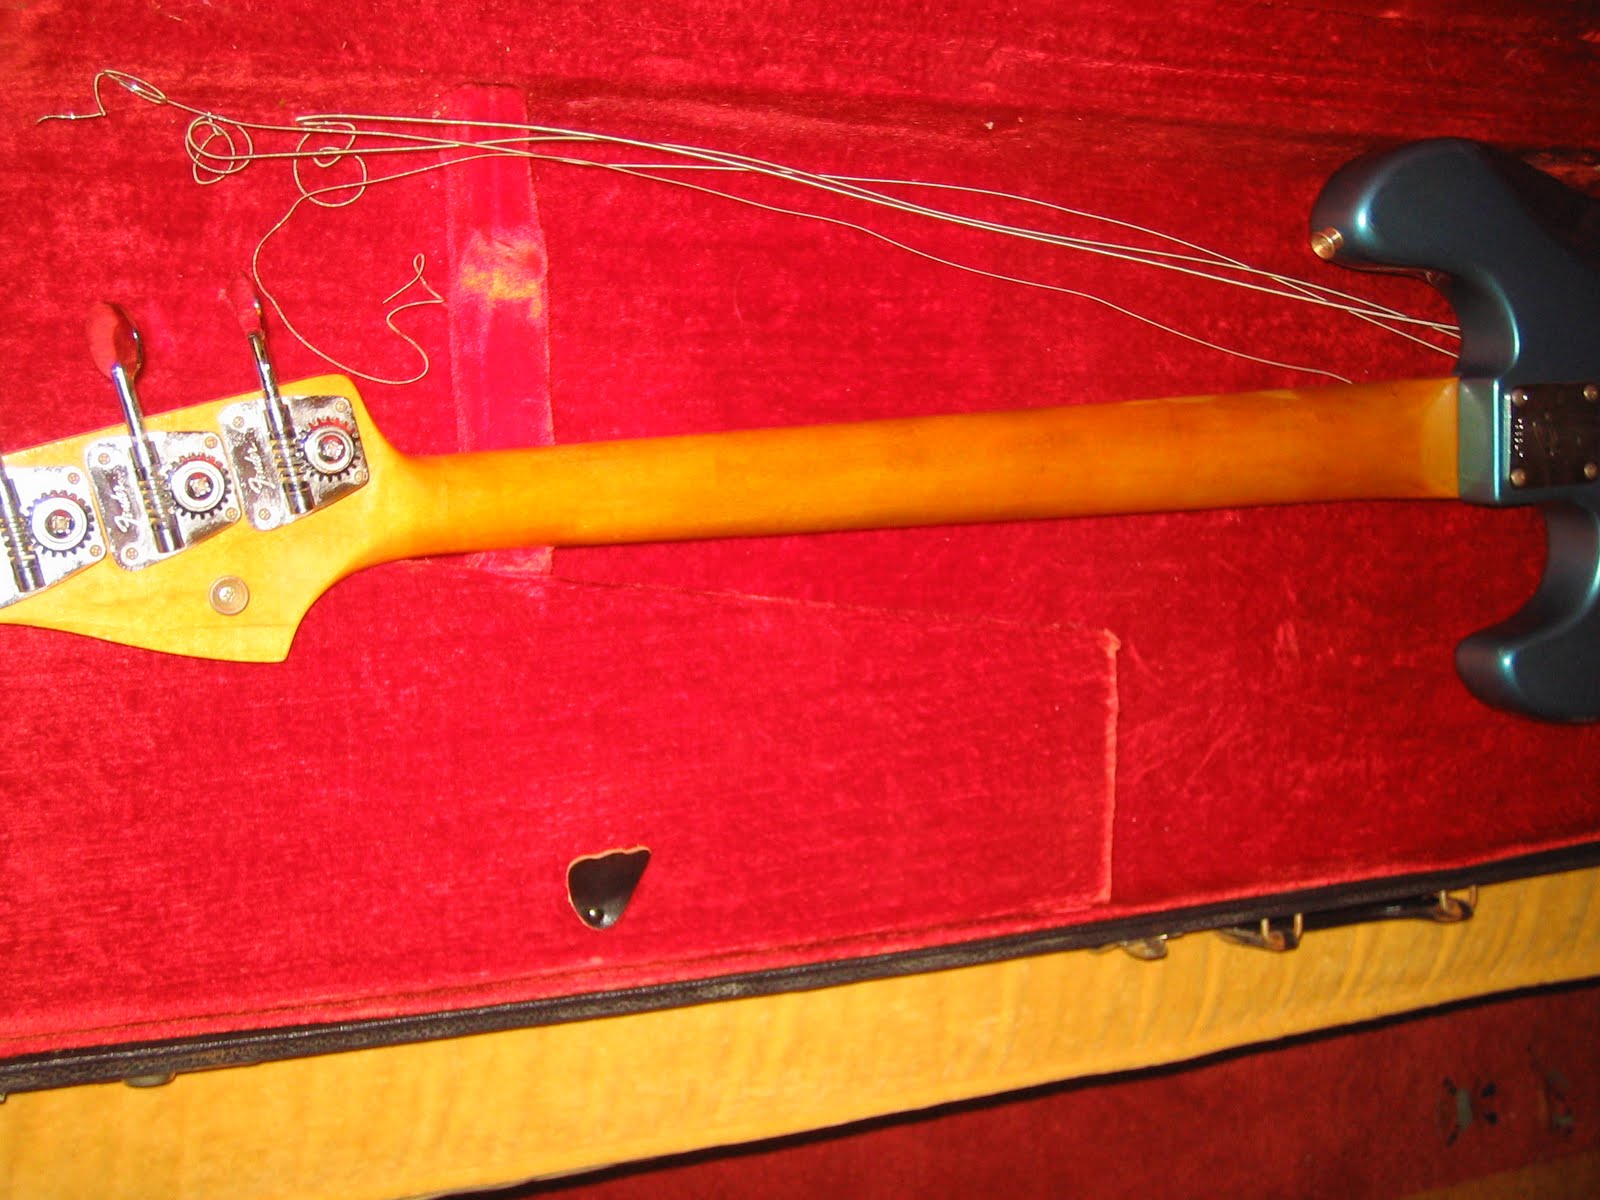
- the highly desirable "lollipop" tuners, which were only used for a brief period by Fender
- the all original bridge
- the original nut with a small repair outboard of the g-string
- the back of the bass
- the original late-1966 "F" neckplate and neck screws.
- the back of the neck, with a nicely worn and ambered finish


The bass plays very well - with low action and just a slight amount of neck relief and still a bit of travel left in the truss rod adjustment.  There is NO lift of the first pearl block inlay, which can be a problem on some of the block inlay Jazz necks.  I have only done a very rudimentary setup on the neck, but that's because it felt great to me.  The intonation is pretty much perfect all the way up and down the neck.

The electronics sound great - with the neck pickup by itself providing some THUNDERING bottom-end, while the two pickups together sound more P-bass-ish.

The bass weighs what a typical 60's Jazz Bass weighs, at a little over 9 lbs  - making this comfortable to wear and play.

I will ship internationally, but be aware that to some locations the case may be TOO large for usual shipping methods - leading to either exorbitant shipping prices or the need to ship the bass with the neck off and without the case.


This is an opportunity to own an excellent and beautiful example of a mid-60s Jazz Bass, in its original case.

Please contact me via my email (krishna at guitargarage.net)  if you have any questions or would like more pictures - or if you want to BUY this bass !!

Thanks to Rainer - enjoy the bass !!!!!
read more →

My First International Job! 1966 Fender Jazz Bass, Dakota Red refinish

Here is an interesting project, not just because its a vintage 60s Fender, but also because of the logistics involved - this Fender Jazz Bass body is from my first international client, all the way from the Holy Land - Israel !!!

The bass in question was originally a Dakota Red 1966 Fender Jazz Bass, which like many custom color instruments had its body modified, stripped and refinished - but not very well. Fortunately, the headstock and most of the original hardware remains.

This bass is owned by Lior Koren of Tel aviv (check out his myspace page here!) - who purchased his Jazz Bass in Israel and then was able to find a second mid-60s Jazz bass body, though this one had been stripped down to a natural finish during the granola-eating, earth-shoe wearing 1970s.

Lior and I talked a bit over Skype (a great FREE way to talk overseas) and decided that what made sense was to refinish the second body to an aged Dakota Red finish that would match the original weathered and darkened headstock.


After discussing the job, Lior decided to send me the body alone, since postage is not trivial between Israel and the US - and we worked out a scheme to coordinate the color of the refinished body with the original headstock.

I sprayed two test panels with Dakota Red lacquer - from ReRanch - and then aged one with an ambered out topcoat - making one end of the test panel slightly ambered and fading to a heavily aged and darkened finish. I figured if I cut the test panels in half - and mailed one set to Israel and kept one set, the owner and I would have common color references to work off of when deciding how "aged" to make the Dakota Red finish.


The panel on the right is straight Dakota Red with a clear gloss coat; the panel on the left has a progressively aged topcoat - a pretty dramatic difference in color!

Meanwhile, the bass body arrived from Israel and it showed a bit of wear and tear the usual bonehead touches - for example - the word "Precious" carved into the wood with a ballpoint pen apparently. Probably the same DOLT decided to outline the pickguard and control panel with the same ball point pen ... over and over and over ... leaving a nice groove in the wood. The body also had a thick uneven coat of some sort of shellac or lacquer. But no extra routes or big chips or any cracks - and fairly lightweight body too. Notice the remnants of the original sunburst finish under the control panel.


The first step was to remove the finish - which I tried sanding with an orbital sander but soon realized it was thicker than I thought and switched to chemical stripper, which took the finish right off. A benefit of the thick ugly clear coat was that it had protected the back of the bass quite well - and what I thought was unevenness in the wood turned out to simply be the uneven finish.


I decided to steam out a few edge dings on the body, which is described in this post on how to steam out dents. I also used a small amount of cellulose filler on some of the deepest gouges - the "P" in precious and a few spots on the back.

After a sanding of the filled areas, the body was ready for staining yellow (as would have been done for all Fender Jazz bass bodies in that era) and a coat of vinyl sealer.


The sealer coat went on very smoothly and just required a light wet sanding with 400 grit paper and the body was ready for priming, with flat white nitrocellulose primer (from Camger Products).

When the primer coat dried, it revealed a number of small chips and dings around the body - as well as the ballpoint pen damage on the front. I used red glazing putty to fill these areas - the majority of what I spread on would be sanded off later before the application of a second coat of primer - don't be alarmed by how large some of the areas are !! The red glazing putty that remains after wet sanding is minimal, but it does result in a nice defect free surface.


After some sanding and one more primer coat, this body will be ready for some COLOR !!

(Update 11/23/08)
Once the glazing putty was dry, the entire body was wet sanded. Note how only a small amount of the red scratch filler is left on the body, and how on the edges the white primer was sanded through.


A final primer coat was applied - and then the body was ready for a color coat.


The color coats are being applied with ReRanch spray cans in this case, as I don't have sufficient demand for Dakota Red paint jobs to justify having a gallon custom mixed for me.

The ReRanch cans are very high quality and apply the color quite evenly.

As you can see, I started by doing the edges of the body - to build up a slightly thicker finish there - and then moved onto the front and back - gradually building up the color.


Finally - the entire body had one coat on it - though it was not yet an even solid color (the finish is actually quite translucent until several coats are built up).


(Update November 28, 2008)
Another color was applied - then after some wet sanding, a few spots were touched up before the base color coat was sealed with a single clear coat. The bass was now a bright fire engine red - but as was explained at the beginning of this post, the goal was to match the original Dakota Red headstock, which had darkened considerably over the past 42 years.


Once the clear coat had dried, it was time to start applying an "aged" clear coat. As with the 1968 Telecaster and 1966 Jazzmaster this meant mixing a tinted clear coat to replicate the browning and ambering effect of time on clear nitro.

The tinting was done using Stewart-MacDonald "Vintage Amber" dye and a "Medium Brown" dye - roughly 3 drops of amber to one drop of medium brown. A fairly strong mix was used - such that spraying a single pass on newspaper gave it a very aged look. The nitro was thinned with acetone fairly thin so it would flow well and dry in a thin coat.

Since OVERDOING it was what I was worried about - I gradually built up the color with 3 thin coats - checking against the "aged" test panel (see above) until I had a much darker color on the Jazz bass.

Due to lighting differences, its tough to get an accurate read on the color of the Jazz bass with my digital camera - but the picture below shows a panel of Dakota Red with just a thin clear coat and no aging - sitting on the "aged" Dakota Red Jazz bass - you can see the color difference is actually pretty dramatic!


(Update Dec.1st)
The Jazz Bass body is on its way back to Lior - to be assembled with the other 66 Jazz bass parts and matching neck.

The final step was to wet sand the refinish with 600 grit wet and dry paper, then working down through 800, 1000 and 1500 grit, before buffing out with two different grits of compound. A final polishing with Scratch-X prepped the body for shipping.

Here are a few pics before I packed it up for shipping - some of the body by itself - and a few of it with hardware from my 66 Jazz Bass.


When Lior gets it all together, he promises to send me some more pics, which I'll post here.


(Update 1/10/09)
A final update on this project - the body was safely shipped back to Lior Koren in Israel - and he was able to quickly assemble the bass with the matching neck and original parts. He then departed on tour - to the US - three days later - with the bass!!

The pictures below show the body assembled with the hardware - including a nicely aged guard, bridge and pickups - and then a separate shot of the matching Dakota Red headstock - with the original finish, original decal and original oval-button Fender tuners.


The final picture is the one and only Lior with his resurrected 66 Jazz bass - ready to rock !! Note that the colors of the body and headstock seem to match pretty well - though the body appears a little shinier since it doesn't have 43 years of accumulated grime on it !!

Nothing a little aggressive and sweaty playing won't fix !!

read more →

1966 Fender Jazzmaster: Aged Olympic White

<
A fairly straightforward project here - a 1966 Fender Jazzmaster body that had been poorly refinished over the years and that the owner wanted to do in an aged Olympic White finish.

The original Olympic White is a color thats seldom seen - its a bright white color that has a slightly bluish and very very slight grey tint to it - which makes it look like a fairly harsh white. However, the vast majority of Olympic White Fenders had a nitro clearcoat, or in later years were sprayed in a polyurethane finish - both of which aged the Olympic White to a buttery yellowish color.

The only truly Olympic White instrument I've seen in person was an early Jazzmaster - probably from 1960- 62, which hadn't been given a clear topcoat, and was therefore still a brilliant white color. And yes I remember my buddy Rod selling it at a guitar show for $800 ... which was a decent price back then .. I'm not sure you can even get a Japanese reissue for that price these days !!!

So this project came to me with a worn flat white finish - which was over the remnants of a black finish - which actually looked like black automotive primer. The guitar obviously had been sunburst originally, but had been stripped before getting its "excellent" refinish. Note the "S" scrawled in the neck pickup cavity for "sunburst" - and the "ES" stamp under the finish between the pickup routes. My post on a 1966 Mustang explains the meaning of the ES stamp.


Fortunately, the finish sanded off very easily and fairly cleanly. I did notice that the grain of the alder body was visible through the poorly done refinish - probably meaning that body had been stripped with steel wool at some point, which has the effect of revealing the grain, since the softer parts of the wood get worn away by the steel wool. Meant the body would require a good sealing and maybe a few primer coats to get a smooth finish.


The body did come out fairly clean - clean enough that redoing the original sunburst would have been an option, but the owner was set on Olympic White. Notice the remnants of the original yellow stain on the back of the body.


Re-dying the body yellow was the first step - followed by several applications of Behlen's clear vinyl sealer, which is very similar to the Fullerplast vinyl sealer that was used by Fender.


After a light sanding, a coat of white nitro primer was applied. The grain was still visible at this stage, so after wetsanding a second primer coat was applied and wet sanded. This appeared to completely fill and level the rear surface of the body, making it ready for the gloss white color coat.

The color coat went on smoothly, since the body had been extensively prepped by this time. Two color coats were applied - with a light sanding inbetween to smooth out any overspray.


I wanted to keep the overall finish as thin as possible, but this was going to be a challenge since I'd already applied two primer coats and the tinting of the overcoat would require at least 4 or 5 clear coats - so as soon as the color coat looked good, I applied a thin clear coat to seal it in and protect it.

I then got the tinted clear coat ready - which I wanted to do in as few passes as possible but still have an even tinting. I decided to use a tinting mix that I had used the day before on a 68 Telecaster refinish - but to cut it slightly with more clear lacquer and a little more acetone (as thinner) than usual.

I sprayed a test patch on a piece of white masonite and set my spray gun for a fairly wide pattern, at a low pressure, with a moderately heavy coat but more thinned than usual lacquer.

As I started spraying - I resisted the impulse to try to build up color quickly, instead building up evenly over several passes. The color came out very even and had exactly the look I wanted - not as yellowed as some 60s Fenders I'd seen, but a nice subtle buttery color.


Two further coats of clear nitro were then applied, to lock in the ambered clear coat. After these had dried for roughly a week and a half, I carefully wet sanded and then buffed out the body - to result in what looks like an aged Olympic White finish.


Once the owner re-assembles the guitar, I will post pictures of the complete instrument.
read more →