Showing posts with label refret. Show all posts

1967 Fender Jazz Bass: Rebuilding a water-damaged rosewood veneer fretboard


I took this project on more as a challenge than as a typical repair - not sure how much I'd charge to do it again, but almost certainly A LOT more than I did in this case I'm documenting ! That being said - this repair does show the resiliency of Fender necks and that almost anything can be repaired on them.

The subject of this post was a 1967 Fender Jazz bass neck that had apparently suffered water damage and then gradually started to fall apart over the years.  It came as part of a package of parts that a client purchased off Ebay from a guitar repair shop that was clearing out some long dormant projects.

 
When I received the neck:  it was missing a chunk of the rosewood fretboard veneer and one fret at the end of the neck, most of the frets were loose, and some of the binding near the nut was missing. And obviously the green nut was NOT original !  Once I started examining and wiggling the frets it became obvious that not only were the frets loose, but so was a significant portion of the rosewood fretboard !!

After removing some of the loosest pieces of the fretboard,  I considered just pulling all the frets up until the 9th fret - and flowing some thin super-glue under the loose portions of the fretboard and clamping it all together and hoping for the best.

But first I took the neck to my friends at Mouradian Guitar Repair, in Winchester, Massachusetts for some consultation.  John Mouradian pointed out that a lot of the fretboard appeared loose and bowed up from the neck - and that the maple strip covering the truss rod also appeared loose.  He told me that I had to make sure that strip was glued back in place - without mucking up the trussrod in the process - so I should take off as much of the rosewood veneer as was loose - and maybe consider planing the neck down for a new slab board.  Though that would be labor intensive as well - since a new board would have to be cut for inlays and binding.

I decided to take a different approach - in an attempt to keep as much of the neck original as possible. I would take John's advice, and remove all the rosewood and inlays that were at all loose - and repair the truss rod overlay - but then I'd REINSTALL the pieces of the original rosewood and inlays - dress the fretboard make sure it was good and flat - and then re-install the original frets and binding.

So I started by removing the binding on the neck - which came off easily with a little warm alcohol/water solution brushed into the seam and a razor blade to gently pry it loose.  I then began working under the rosewood veneer with a razor blade - also flowing in some alcohol and water to try to soften the hide glue - and work my way up from the bottom of the neck.

Loose bits peeled off - note that I left the side dot markers in place !!

As I made my way along the neck - the first pieces came off easily - and note that the veneer was basically sliced into rectangles by the fretslots - the fret slots actually bottom out in the maple of neck!  As I got up towards the 15th fret though, the rosewood started putting up more of a fight - and was cracking into pieces as it came off - with some sections along the treble side of the fretboard remaining very securely attached.  The inlays also proved inconsistent - with some easily popping out and some cracking or requiring a lot of force and prying with a narrow chisel to remove them.

I used a large piece of masking tape to fix the removed pieces in order for later reinstallation.

Finally however, I had everything loose off the neck - and had about 40% of the truss rod overlay exposed - and it was obviously quite loose and popped up from the surface of the neck. I ran a razor blade down the seam of the truss rod overlay to make sure there was some room to work some glue in.


I used Titebond wood glue - working it in with my fingers - it will actually push into the small gap, but unlike superglue, it won't be drawn in by capillary action - and therefore the Titebond won't glue up the truss rod - which would keep the truss rod from working evenly. (tip o' the cap to John Mouradian for that advice !)

Applying Titebond

Working the glue into the seams

Using a slightly damp paper towel to remove extra glue

Clamping the overlay in place - small strips of waxpaper are under the wooden cauls

I did slightly tension the truss rod after the glue had dried for a day - just to see if the overlay had glued in at all - and it didn't budge.  I didn't want to push my luck though, as I figured re-gluing the rosewood and inlays onto the neck would further reinforce the truss rod overlay.

Now came the time to put the puzzle back together !!

A jigsaw puzzle !!

First I had to clean the old glue off the inlays - as well as repair one of the inlays that split (used superglue).  I scraped and sanded the undersides and didn't worry about the tops, since I'd be leveling the fretboard later.


I used Titebond glue to reglue the pieces of fretboard and inlays - making sure that the joined edges also had glue - and then wiping the extra off the surface of the board with a damp paper towel.


Titebond has a pretty long working time, so I was able to glue all the rosewood pieces and inlays in place before I gently clamped everything down with a 7.25 in radius block - with waxpaper between the block and fretboard. Note the lines between the pieces of rosewood in the picture above.


 Remaining chips and gaps were filled with a combination of superglue and rosewood dust, and hit with accelerator spray. Then the defretted portion of the fretboard was sanded with the same clamping block to level out everything.  The view below is after sanding - note the new piece of rosewood added at the very end of the fretboard.


Several more stages of sanding, working down to 600 grit paper - and then some Olde English scratch polish oil to show the results. Even the new piece at the end of the neck matches pretty well.  And you can barely see the lines where the rosewood veneer cracked and was reglued !  Even the repaired inlay looks intact !


Prior to reinstalling the original frets, I lightly recut the fret slots, as they had glue in them from the repairs.  I also straightened any kinks in the frets and then over bent them a little at the ends to make sure they fret ends wouldn't pop out.   I reinstalled the frets with a light bead of Franklin Hide Glue along the tang of each fret - and then once again used the 7.25 inch radius block to clamp the frets in place.

One new fret was installed at the highest position (the shiny one !) and then filed down to match the height and width of the old frets. As you can see - the fretboard looks pretty consistent - with the gaps and seams being all but invisible !  The third inlay from the left was the one that was cracked.


The other end of the fretboard - that LPB headstock will be getting a little cleaning up too !!
Finally, I reinstalled the original binding, which had a split at the very butt of the neck above the truss rod adjustment - probably from some shrinkage and was missing a short segment on the bass side near the nut.  I spliced in a small segment of new binding and lightly tinted it with some lacquer - the splice was visible but at least the neck felt right now in the first fret position.

Regular Duco plastic cement was used, though straight acetone will also work.  The Duco glue will fill more gaps and has a longer working time.  The old side dots made placement of the binding on the bass side of the neck very easy - the binding just snapped on over the dots - almost like two Lego pieces going together!


The replacement piece of binding, shaped to follow the contour of the headstock

Meanwhile - the body had undergone its own restoration - and had the Lake Placid Blue finish heavily ambered to match the very green headtsock - I think I did a pretty good job at matching !!


All in all a fairly challenging piece of work - I think in the future I'd instead replace ALL the frets and sand the entire fretboard after the repair work to really get everything as level and even as possible and to start off a new with fresh frets.

That being said, the bass played very well and had no twist or bow under tension - I had to go back and file a few frets here and there to get the action low, but that's to be expected in most refrets and especially in a case where half the fretboard is re-assembled from fragments !!

Next up - I have to figure out how to fabricate a new veneer fretboard for an Olympic White headstock 1966 Fender Jazz bass neck I have lurking around ....
read more →

Musicmaster Disaster: Completed


Here's a long overdue follow-up on a post from a few years ago.

I started off with an early 70s poplar Fender Musicmaster Bass body that had been mercilessly routed for different pickups and then apparently broken in half and badly reglued together.  The body was a cheap ebay purchase - I think I paid $15 for it plus shipping.

The initial stages of rebuilding and refinishing the body are covered in this post.

I eventually tracked down a 1971 Musicmaster neck that had been defretted and a set of the fairly unique early Musicmaster Bass tuners.

Musicmaster & Mustang Colors

As is often the case - the large body plugs I had glued in when I repaired the body were showing their seam marks, so I ended up sanding the front and back faces of the body flat again and spraying a few more coats of Daphne Blue.

I decided NOT to do a clear coat over the color coat, in keeping with the style of original Musicmaster Bass finishes - though I will point out that Daphne Blue is not a "correct" color for Musicmaster (or Mustang) basses or guitars.

This family of instruments had their own formulations of blue and red - with the blue being a slightly darker and greyer variation on Daphne Blue and the red being a slightly darker version of Dakota Red.  I believe that at least from 1970 on, these were fairly thin polyurethane finishes as opposed to acrylic and nitro lacquer finishes - so it may be that the red and blue were "offset" colors formulated in a different base.  These colors also did not have clear coats applied over them, so they do age slightly differently than typical Fender finishes - with more darkening and less yellowing.

I'm not sure what was used to finish 1965 through 1970 Mustangs and Musicmasters - but my 1966 Mustang Bass does not appear to have a topcoat on it and the color is a bit different from Dakota Red.  If anybody has some details on this, please let me know or post a comment !


Putting It All Together


The neck was a straight-forward refret, using Fender's current "medium" guitar fretwire as opposed to the "jumbo" fretwire used on Fender's full-size basses from 1966 on.

I made the pickguard using an old hacked up Musicmaster Bass pickguard  as a pattern, though I later realized I could have bought one from WD Music Products pretty cheaply.  Those are Strat knobs on the controls in this picture - I replaced them with the proper Jazz Bass style knobs.


The bridge is a recent Bronco Bass bridge, as is the pickup - with rest of the parts (neckplate, knobs, strap-buttons) being standard reissue hardware.  The pickup is a bit different from the original pickup in that it has a bar magnet across the bottom of the pole-pieces (as is typical of many Fender Squier pickups) as opposed to just having magnetic polepieces.  I may swap out the pickup for a reissue vintage Strat or Mustang pickup eventually, as these are much closer to the Mustang/Musicmaster guitar pickups that were used in original Musicmaster basses (yes - there are 6 polepieces under the plastic cover for ALL those Musicmaster basses!).


The bass has round-wound strings on it, but those may also be switched to flatwounds - as I find that combination to sound particularly good on Musicmaster basses!

I do greatly prefer the slimmer 1976 and earlier Musicmaster Bass necks to the much chunkier 1977 to 1982 necks. The more recent Squier Musicmaster and Bronco necks are also of the later chunky shape unfortunately.

And here it is - complete !!


All in all - a good playing lightweight little bass !!
read more →

Saving a fretless, 9-string 1963 Fender Jaguar neck !!


A friend of mine was able to purchase a "project" Jaguar for a very reasonable price - the Jaguar was fitted with a WD replacement neck but also had the original and much abused neck sitting in the case.

I decided to see if I could repair the original neck, since it had a completely different profile (smaller) than the replacement neck and it would add to the value of the guitar IF it could be made playable again.  Plus I like a challenge !


A Poor Sad Old Neck

The neck had at some point been fitted with 3 extra tuners and also been defretted and the slots filled with wood putty.  Not sure what kind of music you play on a 9-string fretless guitar - maybe some kind of experimental drone stuff, like early Sonic Youth or Glen Branca ??

Anyway - beyond the extra holes and missing frets, the fretboard was very heavily worn by the strings (almost scalloped) and also missing a few chunks of the rosewood veneer fretboard and had what at first appeared to be a twist to the neck.

On the plus side, the neck had a nice worn finish on the back that was very comfortable, the original neck date stamp and the truss rod worked.

Below are some pics of what I started with.

Extra tuner holes, note heavy fretboard wear !

Filled fret slots and missing rosewood chunk

Another view of the extensive fretboard wear


Nicely worn finish on the back of the neck

Jun 1963 neckdate - but notice that the right side is shorter than the left side !

I actually took the neck by Steve Morrill, a Boston guitar repairman, to see if he though the neck could be heated and untwisted.  Steve looked at the neck for a few seconds and then said "its not twisted - the heel is uneven".  

And he then pointed out that one side of the heel was shorter than the other - and therefore sighting down the back of the neck, the plane of the heel was not the same as the plane of the back of the headstock.

But the flat of the heel had the various small factory pencil marks - and the original finish on it - so the uneven heel was the way this guitar came out of the factory in 1963 !!  Meaning this instrument definitely had a few of the trademark red plastic heel shims on one side when it shipped to the dealer.  Just an indication of how inconsistent Fender's standards were in the pre-CBS days  - the Jaguar was Fender's top of the line guitar, above both the Jazzmaster AND Stratocaster !!

Fixing the Fretboard

To assess what I had to work with, I lightly sanded the fretboard with a radius block (7.25 inches) after first adjusting the truss rod to flatten out the neck as much as possible.  This clearly revealed the low spots on the fretboard.


Because the wear was so deep, I decided to repair the rosewood as opposed to planing it down to get rid of the wear divots.  I used a technique I had used many years ago on a very worn 1966 Melodymaker, which had held up well over time.

The technique basically uses rosewood powder and cyanocrylate glue (super glue) to fill gaps and low areas.  The resulting composite is very hard, bonds well and looks like dark rosewood, but obviously without any grain.

I used rosewood powder I had saved from a previous fretboard shaping project - I actually have three different colors of rosewood due to the variation in fretboard materials used out there.  I picked one that I thought would match the fretboard once the glue darkened it up - and started applying small mounds of it wherever there was a divot.  I also cut a small rectangle of rosewood to patch the missing chunk at the high end of the fretboard.


I leveled the "filler dust" with the edge of a razor - and then generously applied some Medium consistency cyanocrylate glue to each area - and glued the rosewood chunk in place with the same glue.  

I also filled in some fretslots that were heavily chipped during the defretting and applied glue along these areas as well.

I then sprayed the whole fretboard with an accelerator spray (Rockler brand, but anyone will work) to set the glue almost instantly.

Note that I also slightly drilled out the fronts of the extra string holes and an extra string tree hole and filled them with grey epoxy.

The result is NOT attractive - with large blobs of rosewood/plastic sitting on the fretboard !!


Looks like some kind of cancerous growth !!


Despite the use of accelerator spray to harden the glue, I decided to let the glue fully cure overnight since it was quite heavily applied in some areas and I wanted it fully hardened before I started leveling it.

I sanded the fretboard with the radius block again and heavy grit paper - and when I was done, there were still some low areas - some in the areas I had already filled and some that I neglected to fill during the first pass.

Since these areas were not very deep - I switched to a Thick consistency cyanocrylate and applied it to the low spots.


The second application did the trick - sanding the fretboard again resulted in a nice flat surface - with the filled areas visible as dark patches.  I knew that after oiling, the color would blend in much more plus the patches would be less prominent on the assembled guitar since they would be under the strings!

The fretboard patch would be getting a local application of dark walnut dye to darken it to the color of the surrounding wood.


Next came the time to clean out and in some cases, recut the fret slots and to install the frets.  I used StewMac's standard guitar fretwire and their matching .023 width fretting saw. The fretwire is probably a bit bigger than the original Fender wire from 1963, but it would give me ample room to work the frets if necessary once the neck was under tension.


The slots, cut, the frets bent, cut roughly to length and placed.

I installed the frets and used a small amount of hide glue to hold them in, since the slots in some cases were a little loose.  I then used the radius block as a clamping block and let the glue dry overnight.


The next day I finished fretting the rest of the neck.  Once all the frets were in, I did have to go back and individually clamp and glue a few frets, using a small drop of Thin superglue, so that the capillary action would pull the glue into the fret slot.

The frets did need a little leveling here and there once the neck was under tension - a few iterations, some filing, some polishing and eventually the action was low and even across the neck.


The Rest of the Guitar


As I've covered many refins in this blog already, I'm not going to go into detail on the rest of the work on the guitar, except for one interesting little detail - stripping the painted over original pickguard!

The pickguard that came with the guitar was black, but from the back of it and the edge bevel, I was pretty sure it was the original mint green guard that had come with the Jag from the factory.

I didn't want to use a paint stripper, since it would attack the plastic, I used 400, 600 and 1000 grit wet & dry paper, with plenty of water.  As you can see the black paint came off very quickly.


I then finished up with some buffing compound and some very light buffing, as I didn't want to buff through the patina/aging that survived under the paint !


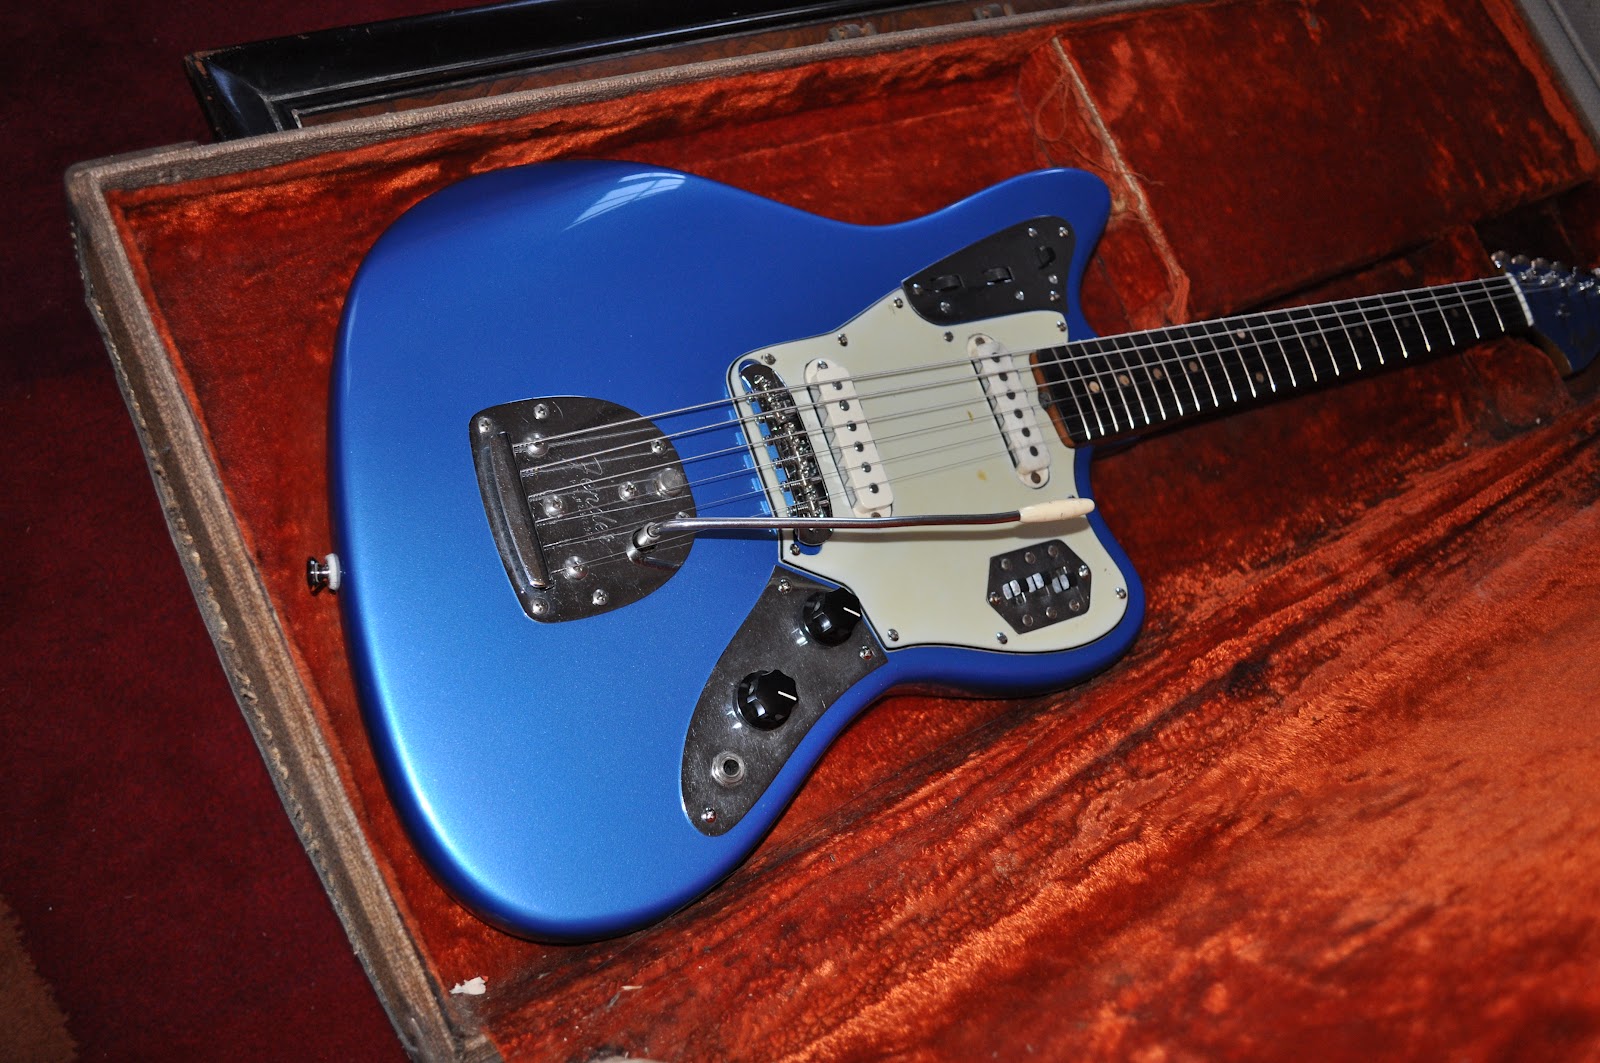
The owner saw another Jaguar I did in Lake Placid Blue and asked for that color for her guitar as well, with a matching headstock to cover up the additional tuner holes and string tree.  The body was in surprisingly good shape and finishing the body and headstock went smoothly. The hardware is a mix of original and replacement parts (one pickup was dead and was replaced).

Ah the fun of wiring a Jaguar !! So many switches and pots !!


As you can see in this pictures - the fretboard ended up looking fine - the clay dots were preserved - and after a bit of shimming, the guitar set up nicely and played well !!  Even the plugs on the back of the headstock don't look THAT bad !!

The small amount of epoxy used hid the extra holes under the finish and repro decal

There they are !  And a set of reissue Kluson tuners


Had to "pose" the completed guitar in an original early 60's brown Fender case !!


read more →