I first got interested in electric guitars and basses when I was a freshman in high school, in New Jersey. I'd discovered some of the "guitar gods" - mostly from watching TV and because I'd finally started listening to FM radio - as opposed to Top 40 AM. The guitar heroes I first became aware of included Eric Clapton, Carlos Santana, Ted Nugent and, of course, Jimi Hendrix.
I think partially out of being a kind of geeky kid, and partially because I was convinced I'd neevr really be ABLE to play (this was the tail-end of the pretentious prog rock era after all), I got very interested in the actual gear that these guys used - the cool guitars with names like Stratocaster, Les Paul and SG.
I decided to build my own guitar .. which provided a really good excuse to start going into a lot of guitar shops and looking at catalogs. The Jersey Shore at that time had a plethora of guitar shops, including one of the earlier "vintage shops", Guitar Trader, in Red Bank, NJ.
Walking into Guitar Trader in 1979 was pretty amazing .. rows of 50s and 60s Strats, a few 50s goldtop and sunburst Les Pauls, etc etc. And the prices back then would make you cry today ... despite the fact that Guitar Trader was considered one of the more expensive places to buy an instrument. A mint '67 Strat might set you back $800 at Guitar Trader, whereas it might be more like $650 at Red Bank Music or Jack's across the street ...
Anyway .. I was fascinated by the shapes, names, chrome, colors and the stories .. and then two more pivotal events occurred to create a nascent "guitar freak".
One was that I saw the movie, "The Kids Are Alright", with John Entwistle's legendary fantasy sequence that showcased his vast guitar collection. Two - I went to see Cheap Trick at Convention Hall in Asbury Park - and Rick Nielsen trotted out gorgeous, colorful guitar after guitar during their show - sometimes he'd be playing with three guitars stacked on-top of each other - jumping up and down as the Fiesta Red Strat bashed into the Red Firebird which was bashing into a Hamer Standard or an Iceman or something. Craziness!
Another evolution occurred over the following year and that was my discovery of the musical underground - starting with the tail-end of the punk scene, with bands like The Clash. The Jam and Ramones, and leading into the amazing "Post-punk" scene that included Gang of Four, PIL, Killing Joke and so on. Seeing these bands convinced me that though I'd never be the next Jimi, I could probably make some kind of noise that at the very least would agitate someone, somewhere.
Throughout the 80s I ended up playing the stripped-down distillation of musical aggro know as "hardcore" - a music and scene that epitomized the philosophy of DIY - Do It Yourself!! I played on many stages, in many basements, in many garages .. anywhere! In some ways I really felt that hardcore was a sort of folk music of its time .. there was (literally) no barrier between the audience and the band .. and anybody could be in a band if they had some drive/motivation.
During that time - while I was still fascinated with guitars, my focus was more on cheap utility instruments and very loud amps .. if I managed to play a nice guitar it was because some kid in another band on the same bill lent it to me !! The instruments I owned were limited - a 70 Precision Bass (still my #1 bass), a highly modified Kimberly guitar with a Dimarzio Super Distortion, a Squier Bullet, also with a Super Distortion, and later a stock 1974 SG Standard.
It was quite a few years before I had enough semi-disposable income to actually start buying guitars, but from 1992 on, my collection accelerated rapidly. I remember making a list of the one dozen guitars I "really wanted" around 1994 ... by the end of the decade I was up to around 80 and my collection currently tops out around 120. Not sure if I got all the guitars on that "hot dozen" list ...
As I started collecting and becoming more knowledgeable about instruments, I realized that if I was willing to buy "fixer uppers", I could get examples of instruments that otherwise would have been completely out of my range. I had always been good with my hands, having taken 4 semesters each of woodshop and autoshop in high school - and worked on all sorts of old Ford Mustangs, Porsches, Datsuns, etc.
A few individuals were also kind enough to give me advice on how to do repair and refinishing work - namely Vinnie Gulizia (formerly of Vinnie's Vintage Guitars, in Chelsea, MA), Jim Mouradian of Mouradian Guitar Repair, and Clay Herrell, who got me started on the "art" of refinishing with his encyclopedic knowledge (check the link to his website in the sidebar).
Over the course of 12 years, I built my repair and refinishing skills to the point where I decided to start my business during the Fall of 2007. The past year and a half have accelerated my learning at an unbelievable rate - I honestly would have to say that I learn something new every week - whether its some bit of information about a vintage instrument, or a new technique, material or tool to use in repair or refinishing. I think it'd get boring if that wasn't true !!
Anyway - that's my story - subject to update of course !!
read more →
Showing posts with label refinishing. Show all posts


My First International Job! 1966 Fender Jazz Bass, Dakota Red refinish
Here is an interesting project, not just because its a vintage 60s Fender, but also because of the logistics involved - this Fender Jazz Bass body is from my first international client, all the way from the Holy Land - Israel !!!
The bass in question was originally a Dakota Red 1966 Fender Jazz Bass, which like many custom color instruments had its body modified, stripped and refinished - but not very well. Fortunately, the headstock and most of the original hardware remains.
This bass is owned by Lior Koren of Tel aviv (check out his myspace page here!) - who purchased his Jazz Bass in Israel and then was able to find a second mid-60s Jazz bass body, though this one had been stripped down to a natural finish during the granola-eating, earth-shoe wearing 1970s.
Lior and I talked a bit over Skype (a great FREE way to talk overseas) and decided that what made sense was to refinish the second body to an aged Dakota Red finish that would match the original weathered and darkened headstock.
After discussing the job, Lior decided to send me the body alone, since postage is not trivial between Israel and the US - and we worked out a scheme to coordinate the color of the refinished body with the original headstock.
I sprayed two test panels with Dakota Red lacquer - from ReRanch - and then aged one with an ambered out topcoat - making one end of the test panel slightly ambered and fading to a heavily aged and darkened finish. I figured if I cut the test panels in half - and mailed one set to Israel and kept one set, the owner and I would have common color references to work off of when deciding how "aged" to make the Dakota Red finish.

The panel on the right is straight Dakota Red with a clear gloss coat; the panel on the left has a progressively aged topcoat - a pretty dramatic difference in color!
Meanwhile, the bass body arrived from Israel and it showed a bit of wear and tear the usual bonehead touches - for example - the word "Precious" carved into the wood with a ballpoint pen apparently. Probably the same DOLT decided to outline the pickguard and control panel with the same ball point pen ... over and over and over ... leaving a nice groove in the wood. The body also had a thick uneven coat of some sort of shellac or lacquer. But no extra routes or big chips or any cracks - and fairly lightweight body too. Notice the remnants of the original sunburst finish under the control panel.


The first step was to remove the finish - which I tried sanding with an orbital sander but soon realized it was thicker than I thought and switched to chemical stripper, which took the finish right off. A benefit of the thick ugly clear coat was that it had protected the back of the bass quite well - and what I thought was unevenness in the wood turned out to simply be the uneven finish.


I decided to steam out a few edge dings on the body, which is described in this post on how to steam out dents. I also used a small amount of cellulose filler on some of the deepest gouges - the "P" in precious and a few spots on the back.
After a sanding of the filled areas, the body was ready for staining yellow (as would have been done for all Fender Jazz bass bodies in that era) and a coat of vinyl sealer.

The sealer coat went on very smoothly and just required a light wet sanding with 400 grit paper and the body was ready for priming, with flat white nitrocellulose primer (from Camger Products).
When the primer coat dried, it revealed a number of small chips and dings around the body - as well as the ballpoint pen damage on the front. I used red glazing putty to fill these areas - the majority of what I spread on would be sanded off later before the application of a second coat of primer - don't be alarmed by how large some of the areas are !! The red glazing putty that remains after wet sanding is minimal, but it does result in a nice defect free surface.


After some sanding and one more primer coat, this body will be ready for some COLOR !!
(Update 11/23/08)
Once the glazing putty was dry, the entire body was wet sanded. Note how only a small amount of the red scratch filler is left on the body, and how on the edges the white primer was sanded through.


A final primer coat was applied - and then the body was ready for a color coat.

The color coats are being applied with ReRanch spray cans in this case, as I don't have sufficient demand for Dakota Red paint jobs to justify having a gallon custom mixed for me.
The ReRanch cans are very high quality and apply the color quite evenly.
As you can see, I started by doing the edges of the body - to build up a slightly thicker finish there - and then moved onto the front and back - gradually building up the color.


Finally - the entire body had one coat on it - though it was not yet an even solid color (the finish is actually quite translucent until several coats are built up).

(Update November 28, 2008)
Another color was applied - then after some wet sanding, a few spots were touched up before the base color coat was sealed with a single clear coat. The bass was now a bright fire engine red - but as was explained at the beginning of this post, the goal was to match the original Dakota Red headstock, which had darkened considerably over the past 42 years.

Once the clear coat had dried, it was time to start applying an "aged" clear coat. As with the 1968 Telecaster and 1966 Jazzmaster this meant mixing a tinted clear coat to replicate the browning and ambering effect of time on clear nitro.
The tinting was done using Stewart-MacDonald "Vintage Amber" dye and a "Medium Brown" dye - roughly 3 drops of amber to one drop of medium brown. A fairly strong mix was used - such that spraying a single pass on newspaper gave it a very aged look. The nitro was thinned with acetone fairly thin so it would flow well and dry in a thin coat.
Since OVERDOING it was what I was worried about - I gradually built up the color with 3 thin coats - checking against the "aged" test panel (see above) until I had a much darker color on the Jazz bass.
Due to lighting differences, its tough to get an accurate read on the color of the Jazz bass with my digital camera - but the picture below shows a panel of Dakota Red with just a thin clear coat and no aging - sitting on the "aged" Dakota Red Jazz bass - you can see the color difference is actually pretty dramatic!

(Update Dec.1st)
The Jazz Bass body is on its way back to Lior - to be assembled with the other 66 Jazz bass parts and matching neck.
The final step was to wet sand the refinish with 600 grit wet and dry paper, then working down through 800, 1000 and 1500 grit, before buffing out with two different grits of compound. A final polishing with Scratch-X prepped the body for shipping.
Here are a few pics before I packed it up for shipping - some of the body by itself - and a few of it with hardware from my 66 Jazz Bass.


When Lior gets it all together, he promises to send me some more pics, which I'll post here.
(Update 1/10/09)
A final update on this project - the body was safely shipped back to Lior Koren in Israel - and he was able to quickly assemble the bass with the matching neck and original parts. He then departed on tour - to the US - three days later - with the bass!!
The pictures below show the body assembled with the hardware - including a nicely aged guard, bridge and pickups - and then a separate shot of the matching Dakota Red headstock - with the original finish, original decal and original oval-button Fender tuners.


The final picture is the one and only Lior with his resurrected 66 Jazz bass - ready to rock !! Note that the colors of the body and headstock seem to match pretty well - though the body appears a little shinier since it doesn't have 43 years of accumulated grime on it !!
Nothing a little aggressive and sweaty playing won't fix !!
 read more →
The bass in question was originally a Dakota Red 1966 Fender Jazz Bass, which like many custom color instruments had its body modified, stripped and refinished - but not very well. Fortunately, the headstock and most of the original hardware remains.
This bass is owned by Lior Koren of Tel aviv (check out his myspace page here!) - who purchased his Jazz Bass in Israel and then was able to find a second mid-60s Jazz bass body, though this one had been stripped down to a natural finish during the granola-eating, earth-shoe wearing 1970s.
Lior and I talked a bit over Skype (a great FREE way to talk overseas) and decided that what made sense was to refinish the second body to an aged Dakota Red finish that would match the original weathered and darkened headstock.
After discussing the job, Lior decided to send me the body alone, since postage is not trivial between Israel and the US - and we worked out a scheme to coordinate the color of the refinished body with the original headstock.
I sprayed two test panels with Dakota Red lacquer - from ReRanch - and then aged one with an ambered out topcoat - making one end of the test panel slightly ambered and fading to a heavily aged and darkened finish. I figured if I cut the test panels in half - and mailed one set to Israel and kept one set, the owner and I would have common color references to work off of when deciding how "aged" to make the Dakota Red finish.

The panel on the right is straight Dakota Red with a clear gloss coat; the panel on the left has a progressively aged topcoat - a pretty dramatic difference in color!
Meanwhile, the bass body arrived from Israel and it showed a bit of wear and tear the usual bonehead touches - for example - the word "Precious" carved into the wood with a ballpoint pen apparently. Probably the same DOLT decided to outline the pickguard and control panel with the same ball point pen ... over and over and over ... leaving a nice groove in the wood. The body also had a thick uneven coat of some sort of shellac or lacquer. But no extra routes or big chips or any cracks - and fairly lightweight body too. Notice the remnants of the original sunburst finish under the control panel.


The first step was to remove the finish - which I tried sanding with an orbital sander but soon realized it was thicker than I thought and switched to chemical stripper, which took the finish right off. A benefit of the thick ugly clear coat was that it had protected the back of the bass quite well - and what I thought was unevenness in the wood turned out to simply be the uneven finish.


I decided to steam out a few edge dings on the body, which is described in this post on how to steam out dents. I also used a small amount of cellulose filler on some of the deepest gouges - the "P" in precious and a few spots on the back.
After a sanding of the filled areas, the body was ready for staining yellow (as would have been done for all Fender Jazz bass bodies in that era) and a coat of vinyl sealer.

The sealer coat went on very smoothly and just required a light wet sanding with 400 grit paper and the body was ready for priming, with flat white nitrocellulose primer (from Camger Products).
When the primer coat dried, it revealed a number of small chips and dings around the body - as well as the ballpoint pen damage on the front. I used red glazing putty to fill these areas - the majority of what I spread on would be sanded off later before the application of a second coat of primer - don't be alarmed by how large some of the areas are !! The red glazing putty that remains after wet sanding is minimal, but it does result in a nice defect free surface.


After some sanding and one more primer coat, this body will be ready for some COLOR !!
(Update 11/23/08)
Once the glazing putty was dry, the entire body was wet sanded. Note how only a small amount of the red scratch filler is left on the body, and how on the edges the white primer was sanded through.


A final primer coat was applied - and then the body was ready for a color coat.

The color coats are being applied with ReRanch spray cans in this case, as I don't have sufficient demand for Dakota Red paint jobs to justify having a gallon custom mixed for me.
The ReRanch cans are very high quality and apply the color quite evenly.
As you can see, I started by doing the edges of the body - to build up a slightly thicker finish there - and then moved onto the front and back - gradually building up the color.


Finally - the entire body had one coat on it - though it was not yet an even solid color (the finish is actually quite translucent until several coats are built up).

(Update November 28, 2008)
Another color was applied - then after some wet sanding, a few spots were touched up before the base color coat was sealed with a single clear coat. The bass was now a bright fire engine red - but as was explained at the beginning of this post, the goal was to match the original Dakota Red headstock, which had darkened considerably over the past 42 years.

Once the clear coat had dried, it was time to start applying an "aged" clear coat. As with the 1968 Telecaster and 1966 Jazzmaster this meant mixing a tinted clear coat to replicate the browning and ambering effect of time on clear nitro.
The tinting was done using Stewart-MacDonald "Vintage Amber" dye and a "Medium Brown" dye - roughly 3 drops of amber to one drop of medium brown. A fairly strong mix was used - such that spraying a single pass on newspaper gave it a very aged look. The nitro was thinned with acetone fairly thin so it would flow well and dry in a thin coat.
Since OVERDOING it was what I was worried about - I gradually built up the color with 3 thin coats - checking against the "aged" test panel (see above) until I had a much darker color on the Jazz bass.
Due to lighting differences, its tough to get an accurate read on the color of the Jazz bass with my digital camera - but the picture below shows a panel of Dakota Red with just a thin clear coat and no aging - sitting on the "aged" Dakota Red Jazz bass - you can see the color difference is actually pretty dramatic!

(Update Dec.1st)
The Jazz Bass body is on its way back to Lior - to be assembled with the other 66 Jazz bass parts and matching neck.
The final step was to wet sand the refinish with 600 grit wet and dry paper, then working down through 800, 1000 and 1500 grit, before buffing out with two different grits of compound. A final polishing with Scratch-X prepped the body for shipping.
Here are a few pics before I packed it up for shipping - some of the body by itself - and a few of it with hardware from my 66 Jazz Bass.


When Lior gets it all together, he promises to send me some more pics, which I'll post here.
(Update 1/10/09)
A final update on this project - the body was safely shipped back to Lior Koren in Israel - and he was able to quickly assemble the bass with the matching neck and original parts. He then departed on tour - to the US - three days later - with the bass!!
The pictures below show the body assembled with the hardware - including a nicely aged guard, bridge and pickups - and then a separate shot of the matching Dakota Red headstock - with the original finish, original decal and original oval-button Fender tuners.


The final picture is the one and only Lior with his resurrected 66 Jazz bass - ready to rock !! Note that the colors of the body and headstock seem to match pretty well - though the body appears a little shinier since it doesn't have 43 years of accumulated grime on it !!
Nothing a little aggressive and sweaty playing won't fix !!
 read more →
To my International Readers - Interest in Guitar Refin Services ??
I have noticed that a good chunk of the visitors to my blog are from Europe and Australia - as well as a smattering from Japan, South America, India, the Ukraine, etc., etc.
I am able to see the country and city most visitors are connecting from via EWebCounter - a freebie service that runs the counter on my webpage and also keeps a running tally of country by country visits to my blog. Pretty nifty, though I do admit it also brings home the "Big Brother" possibilities of the internet ... I am a big fan of George Orwell's cautionary tales.
Anyway - I digress - my question to international readers is - would you consider using my refinishing services if I could keep the shipping costs down and promise a consistent turn around time ?
Here are a few points to consider, using a Fender Precision body as an example:
- shipping cost, without any hardware, from the USA to western europe is around $40 US (33 Euros); the shipping cost from Europe to me probably varies by country, but I'd estimate that the roundtrip cost would be around $100 US.
- shipping time seems to be on the order of 1 week each way, so a roundtrip time of 2 weeks, plus of course the time for me to do a refinish
- customs duty: I will have to look into this, but there should be no customs duty either way since no merchandise is actually changing hands - probably some special forms I'd need to provide and fill out. This can be a significant point since the duty is on the order of 25% for most of europe.
- my pricing for refinishing and repair is the same regardless of where you are from, so for a Fender body that would typically run from $200 to $300 US.
So the bottom line is that a refin of a Fender Precision body for a customer in say Norway would cost around $300 to $400 and take about 6 to 8 weeks. I'm not sure how available nitro refins are in most of Europe, but I'd guess with the cost of labor and weakness of the dollar my prices would be lower. And I have access to all those nice custom colors.
I welcome feedback - either through the comments function - or via email directly at:
repairs@bostonguitarrepair.com
Thanks !! read more →
I am able to see the country and city most visitors are connecting from via EWebCounter - a freebie service that runs the counter on my webpage and also keeps a running tally of country by country visits to my blog. Pretty nifty, though I do admit it also brings home the "Big Brother" possibilities of the internet ... I am a big fan of George Orwell's cautionary tales.
Anyway - I digress - my question to international readers is - would you consider using my refinishing services if I could keep the shipping costs down and promise a consistent turn around time ?
Here are a few points to consider, using a Fender Precision body as an example:
- shipping cost, without any hardware, from the USA to western europe is around $40 US (33 Euros); the shipping cost from Europe to me probably varies by country, but I'd estimate that the roundtrip cost would be around $100 US.
- shipping time seems to be on the order of 1 week each way, so a roundtrip time of 2 weeks, plus of course the time for me to do a refinish
- customs duty: I will have to look into this, but there should be no customs duty either way since no merchandise is actually changing hands - probably some special forms I'd need to provide and fill out. This can be a significant point since the duty is on the order of 25% for most of europe.
- my pricing for refinishing and repair is the same regardless of where you are from, so for a Fender body that would typically run from $200 to $300 US.
So the bottom line is that a refin of a Fender Precision body for a customer in say Norway would cost around $300 to $400 and take about 6 to 8 weeks. I'm not sure how available nitro refins are in most of Europe, but I'd guess with the cost of labor and weakness of the dollar my prices would be lower. And I have access to all those nice custom colors.
I welcome feedback - either through the comments function - or via email directly at:
repairs@bostonguitarrepair.com
Thanks !! read more →
SOLD!: 1966 Fender Mustang Guitar, Daphne Blue Refinish
Yet another project I recently took on - a stripped 1966 Mustang guitar. The guitar is mostly all there, with the exception of the finish on the body. The guitar was originally Daphne Blue and given what a nice color that is, and the Kurt Cobain connection, I have decided I will return this guitar to its original color.
As with many members of the Mustang/Musicmaster family of guitars and basses, the body appears to be made of poplar as opposed to the alder that Fender usually used. I say poplar because of the greenish color of the grain.

The changes to the guitar are limited to the following:
- two slider switches replaced with toggles
- one pot replaced with a 68 pot
- tremelo bar missing
- strap buttons replaced
- body stripped
The guitar is in very good condition and with a refin and a setup will be an excellent example of this classic 60s guitar. The case is worn but all there, and is covered in the proper silver-grey material with a burnt orange interior.
The main thing that has to be done is that the body must be sanded down and then refinished. Fortunately the body doesn't appear to have been too roughly stripped and the clear refinish appears to be lacquer of some sort, so sanding it smooth may actually provide a good sealer coat for the refin.

The first step is to disassemble the guitar. Note the traces of the original finish in the neck pocket and bridge cavities.


The pickups have hand written dates of "8-2-1966" on their bobbins to match the August 1966 neck stamp.

One last interesting feature are the two letters "ES" stamped into the wood under the pickguard - these may have been added later by one of the guitars many owners or may be from the factory - as the lettering is in the same style that Fender applied to factory refins during the 1960s - though I have no idea what "ES" would stand for.
I have ordered a gallon of Daphne Blue nitrocellulose from Eastern ChemLac for this guitar and expect to refinish it within the next week or so - check back for updates!
(Update, April 19th 2008)
The guitar body is now painted Daphne Blue - below are two pictures of the color coat, just after wet sanding and awaiting clear coating.


( Update April 22nd, 2008)
From Clay Herrel's alway's informative site (http://www.provide.net/~cfh) - here is an explantion of the "ES" stamp under the pickguard of this Mustang:
" In 1966, Fender used the "ES" code a lot on their custom color instruments. At least for 1966, the ES code was used as some sort of default for custom colored instruments (be it Teles, or Strats or Jazz Basses). This two letters ("ES" for "Enter Special") seems to denote a special order, at least for 1966. Again this is has been seen lots of times on 1966 documented original custom color instruments. I have also seen the "ES" stamp on some 1966 sunburst instruments! (Perhaps these guitars were special show models, so extra care was taken in their finish.) The 1/2" tall 2-letter code were a factory color code, and are completely different than the 1/2" tall three-digit codes. The two-letter code appears to be CBS/Fender's way of specifying bodies to be painted a custom color for a special order once the body was in the spray booth. If a guitar has a two letter code on the body *only* (and not the neck), again this confirms the 2-letter code was an original factory color code (and does not indicate a factory refinish order). But then there is this question: why do only some 1965-1968 custom color Fenders have this two letter code and others do not? It may have to do with how many custom colored guitars were being painted at any point in time, and the 2-letter code was applied to avoid confusion. Or it was applied just for particular special orders (like a Fender NAMM show guitar or a special dealer/artist order)."
So there you have it - someone wanted a Daphne Blue Mustang - and they wanted it NOW !!!
After clear coating - the body had a tinted clear coat applied , which slightly greens out and dulls the color - so that the finish looks more like an older Daphne Blue finish. This is with a little ambering - I will clear coat it again and then buff out the finish to a nice shine. This guitar should be ready this coming week!

With the parts just sitting in place - still need to replace those switches - but starting to look good !

(Update May 11 2008)
Ok another project completed and ready to go - this turned out to be a very cool little guitar. I was able to find a nice wiring diagram online and a few pictures of the wiring for an all original 'stang - which enabled me to replace the two switches and wire everything up correctly. I had to use some reissue cloth wire in a few places but was also able to save a bit of the 42 year old wiring.
I also replaced the one incorrect pot with a recent CTS pot, but the other pot, capacitor and jack are original.


The crazy dual switch set up of the Mustang guitar allows for some serious tonal variation - kind of cool, but I guess you'd really have to remember which combinations you want for which sounds. I found the one PHAT setting - very nice!
Finally - after wet sanding and buffing out the body - the guitar was ready for reassembly - and it turned out well - see below for a selection of pictures. I replaced the super light strings it had on it with a set of medium/heavy strings and loosened up the over-tightened truss rod - and the guitar dialed right in.
Just like good ol' Kurt Cobain used to play - except not a lefty !


I will be adding more pictures in the near future.
I am asking $1100 plus shipping for this guitar - though I am willing to negotiate downwards if you don't want the original 1966 neckplate.
SOLD - thank you to Axel in Germany - enjoy it !! read more →
As with many members of the Mustang/Musicmaster family of guitars and basses, the body appears to be made of poplar as opposed to the alder that Fender usually used. I say poplar because of the greenish color of the grain.
The changes to the guitar are limited to the following:
- two slider switches replaced with toggles
- one pot replaced with a 68 pot
- tremelo bar missing
- strap buttons replaced
- body stripped
The guitar is in very good condition and with a refin and a setup will be an excellent example of this classic 60s guitar. The case is worn but all there, and is covered in the proper silver-grey material with a burnt orange interior.
The main thing that has to be done is that the body must be sanded down and then refinished. Fortunately the body doesn't appear to have been too roughly stripped and the clear refinish appears to be lacquer of some sort, so sanding it smooth may actually provide a good sealer coat for the refin.
The first step is to disassemble the guitar. Note the traces of the original finish in the neck pocket and bridge cavities.
The pickups have hand written dates of "8-2-1966" on their bobbins to match the August 1966 neck stamp.
One last interesting feature are the two letters "ES" stamped into the wood under the pickguard - these may have been added later by one of the guitars many owners or may be from the factory - as the lettering is in the same style that Fender applied to factory refins during the 1960s - though I have no idea what "ES" would stand for.
I have ordered a gallon of Daphne Blue nitrocellulose from Eastern ChemLac for this guitar and expect to refinish it within the next week or so - check back for updates!
(Update, April 19th 2008)
The guitar body is now painted Daphne Blue - below are two pictures of the color coat, just after wet sanding and awaiting clear coating.
( Update April 22nd, 2008)
From Clay Herrel's alway's informative site (http://www.provide.net/~cfh) - here is an explantion of the "ES" stamp under the pickguard of this Mustang:
" In 1966, Fender used the "ES" code a lot on their custom color instruments. At least for 1966, the ES code was used as some sort of default for custom colored instruments (be it Teles, or Strats or Jazz Basses). This two letters ("ES" for "Enter Special") seems to denote a special order, at least for 1966. Again this is has been seen lots of times on 1966 documented original custom color instruments. I have also seen the "ES" stamp on some 1966 sunburst instruments! (Perhaps these guitars were special show models, so extra care was taken in their finish.) The 1/2" tall 2-letter code were a factory color code, and are completely different than the 1/2" tall three-digit codes. The two-letter code appears to be CBS/Fender's way of specifying bodies to be painted a custom color for a special order once the body was in the spray booth. If a guitar has a two letter code on the body *only* (and not the neck), again this confirms the 2-letter code was an original factory color code (and does not indicate a factory refinish order). But then there is this question: why do only some 1965-1968 custom color Fenders have this two letter code and others do not? It may have to do with how many custom colored guitars were being painted at any point in time, and the 2-letter code was applied to avoid confusion. Or it was applied just for particular special orders (like a Fender NAMM show guitar or a special dealer/artist order)."
So there you have it - someone wanted a Daphne Blue Mustang - and they wanted it NOW !!!
After clear coating - the body had a tinted clear coat applied , which slightly greens out and dulls the color - so that the finish looks more like an older Daphne Blue finish. This is with a little ambering - I will clear coat it again and then buff out the finish to a nice shine. This guitar should be ready this coming week!
With the parts just sitting in place - still need to replace those switches - but starting to look good !
(Update May 11 2008)
Ok another project completed and ready to go - this turned out to be a very cool little guitar. I was able to find a nice wiring diagram online and a few pictures of the wiring for an all original 'stang - which enabled me to replace the two switches and wire everything up correctly. I had to use some reissue cloth wire in a few places but was also able to save a bit of the 42 year old wiring.
I also replaced the one incorrect pot with a recent CTS pot, but the other pot, capacitor and jack are original.
The crazy dual switch set up of the Mustang guitar allows for some serious tonal variation - kind of cool, but I guess you'd really have to remember which combinations you want for which sounds. I found the one PHAT setting - very nice!
Finally - after wet sanding and buffing out the body - the guitar was ready for reassembly - and it turned out well - see below for a selection of pictures. I replaced the super light strings it had on it with a set of medium/heavy strings and loosened up the over-tightened truss rod - and the guitar dialed right in.
Just like good ol' Kurt Cobain used to play - except not a lefty !
I will be adding more pictures in the near future.
I am asking $1100 plus shipping for this guitar - though I am willing to negotiate downwards if you don't want the original 1966 neckplate.
SOLD - thank you to Axel in Germany - enjoy it !! read more →
1966 Fender Precision Bass - basket case to Sea Foam Green Beauty !!
Since my post on the on-going 1964 P-bass restoration seems to be generating a bit of interest, I thought I'd write a post on a 1966 Precision bass I assembled and restored from some very abused parts I had gathered up over the years.
My expectations were kind of low on how well it would turn out, but in the end it turned out to be perhaps the nicest playing 66 P-bass I have had my hands on. It currently resides in Norway, where it rocks out on a weekly basis with its new owner. I expect it to have at least ANOTHER 40 years of rock n rolling in its bones.
This bass started out with a neck I purchased on Ebay many years ago - as a refret project. The neck was advertised as having trashed, worn out frets but otherwise in good shape. When I got the neck I looked at the frets and thought that there was still enough meat on them to keep em, but someone had done a real hamfisted job on removing the tuner ferrules - with what looked like a fat screwdriver - scratching up the headstock. Other than that, the neck was solid and cosmetically fine.
About a year later - I found a severely hacked mid-60's P-bass body on Ebay. Some rocket scientest had set up this poor bass with the following: a Gibson bass "mudbucker" at the neck, a P-bass pickup in the middle and TWO jazz bass pickups at the bridge - the poor Precision had THREE massive Gibson-sized holes (I won't call them routings, since it looked more like 5th grader with a dull chisel had cut them out) in its face, and of course, an expanded control cavity for some extra pots, switches, batteries and such.
I wish I had "before" pictures of the body - I did save the pickguard that was on it - and that probably says enough ..

However, to quote Lou Reed, "despite all the amputation .." - the contours of the bass body were in great shape - the rear scoop was nice and deep - the doweled pin marks were in the right place, etc etc. The depth of the rear scoop actually made me think this might be an earlier body, but more on that later.
Sometime after getting these two key components, I found a refinished black 66 P-bass on Craigslist - a very nice bass - for $700 - and this project got back-burnered big time.
Over the next several years - as I constantly/semi-obsessively gathered up vintage Fender parts - I eventually had many of the missing pieces to assemble a 66 P-bass - I found a set of tuners, a neckplate with someones SS# scratched into it, an older bridge (though the pedigree of the saddles was questionable) and a SWEET grey bottom pickup.
So the project came back to life. Obviously the biggest task was to restore the horribly mangled body. Once I had the bass strung up, I'd decide on a neck refret.
Step one was to clean up the areas that needed to be blocked with a router, so that the bottoms were at a consistent depth and I could get a good glue bond for the blocks I'd be installing. I then cut the blocks out of matching alder wood (from Stewart-MacDonald) and glued them in with tightbond and clamped them.

Of course there were gaps around the odd-shaped blocks - which were filled with smaller pieces and shavings of alder and titebond - with a minimal amount of cellulose filler used to do a final fill in. I wanted to use alder wood to the greatest extent possible so that there wouldn't be shrinkage problems down the road. I also used blocks that extended SLIGHTLY above the height of the rest of the body as I knew that the freshly cut alder blocks would probably shrink a tiny bit.

I let the blocked body dry out and settle in for several weeks - kept it in a dry place in my attic. The picture below shows all the blocking done, with a smear of wood filler over the boundaries before I began sanding to level the entire top.
Once the top was level and smooth - I marked out the location of the pickup route and the control cavity, to try to return them to as close to the original configuration - and then routed these out.

Now the body was looking pretty decent - and though the blocking and glue had added some weight relative to an all original body, the body was still lightweight at 4 lbs, 10 oz. I then stained the body back to the original yellow and sealed the stain with a coat of vinyl sealer (similar to the Fullerplast sealer Fender used in the 60s). The picture of the butt end of the bass body shows some remnants of the original yellow stain.


Next came a coat of white lacquer primer - followed by a little glazing putting in the remaining rough spots - some wet sanding - and another thin coat of white primer.


Now the body was finally ready for the color coat. I used ReRanch's Sea Foam Green nitrocellulose - which comes in high quality spray cans - it typically takes about 1 1/2 cans to do an entire body . The color went onto the white primer beautifully - and looked gorgeous even before wet sanding and clear coating. Notice how my flash photos make the color look almost like Daphne Blue, whereas other colors show of the green tint more.


After several rounds of wet sanding and color coats - the body was clearcoated - without any tint - and then buffed out to not-too shiny finish - I didn't want it to look brand new. The neck was bolted on - and this is when I realized that this WAS a late 66 body to match the neck - because the neck was exceptionally wide at the heel - and didn't fit my earlier 66 or 63 P-bass - but fit the body I had redone incredibly well !! And one the bass was strung up - I just had to file three frets at the high end of the fretboard and the bass played beautifully all the way up and down the neck - no need for a refret for at least another decade or two !!


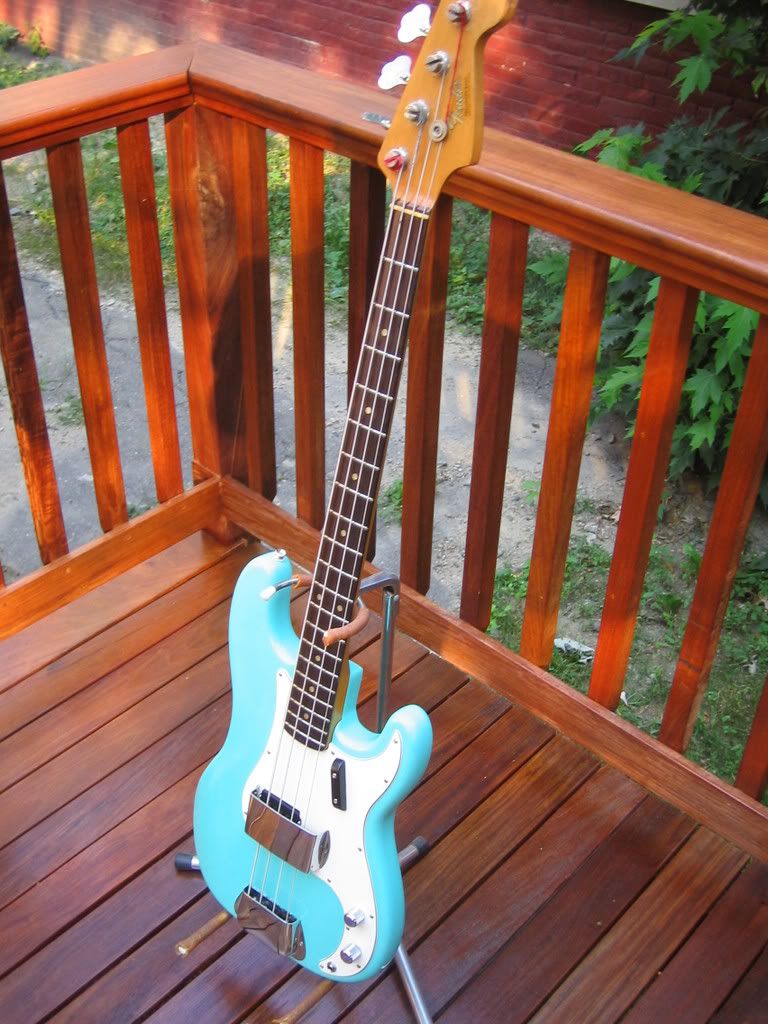
Here is the completed bass - just before its trans-Atlantic trip to the land of Fjords and Viking-rockers !!
 read more →
My expectations were kind of low on how well it would turn out, but in the end it turned out to be perhaps the nicest playing 66 P-bass I have had my hands on. It currently resides in Norway, where it rocks out on a weekly basis with its new owner. I expect it to have at least ANOTHER 40 years of rock n rolling in its bones.
This bass started out with a neck I purchased on Ebay many years ago - as a refret project. The neck was advertised as having trashed, worn out frets but otherwise in good shape. When I got the neck I looked at the frets and thought that there was still enough meat on them to keep em, but someone had done a real hamfisted job on removing the tuner ferrules - with what looked like a fat screwdriver - scratching up the headstock. Other than that, the neck was solid and cosmetically fine.
About a year later - I found a severely hacked mid-60's P-bass body on Ebay. Some rocket scientest had set up this poor bass with the following: a Gibson bass "mudbucker" at the neck, a P-bass pickup in the middle and TWO jazz bass pickups at the bridge - the poor Precision had THREE massive Gibson-sized holes (I won't call them routings, since it looked more like 5th grader with a dull chisel had cut them out) in its face, and of course, an expanded control cavity for some extra pots, switches, batteries and such.
I wish I had "before" pictures of the body - I did save the pickguard that was on it - and that probably says enough ..
However, to quote Lou Reed, "despite all the amputation .." - the contours of the bass body were in great shape - the rear scoop was nice and deep - the doweled pin marks were in the right place, etc etc. The depth of the rear scoop actually made me think this might be an earlier body, but more on that later.
Sometime after getting these two key components, I found a refinished black 66 P-bass on Craigslist - a very nice bass - for $700 - and this project got back-burnered big time.
Over the next several years - as I constantly/semi-obsessively gathered up vintage Fender parts - I eventually had many of the missing pieces to assemble a 66 P-bass - I found a set of tuners, a neckplate with someones SS# scratched into it, an older bridge (though the pedigree of the saddles was questionable) and a SWEET grey bottom pickup.
So the project came back to life. Obviously the biggest task was to restore the horribly mangled body. Once I had the bass strung up, I'd decide on a neck refret.
Step one was to clean up the areas that needed to be blocked with a router, so that the bottoms were at a consistent depth and I could get a good glue bond for the blocks I'd be installing. I then cut the blocks out of matching alder wood (from Stewart-MacDonald) and glued them in with tightbond and clamped them.
Of course there were gaps around the odd-shaped blocks - which were filled with smaller pieces and shavings of alder and titebond - with a minimal amount of cellulose filler used to do a final fill in. I wanted to use alder wood to the greatest extent possible so that there wouldn't be shrinkage problems down the road. I also used blocks that extended SLIGHTLY above the height of the rest of the body as I knew that the freshly cut alder blocks would probably shrink a tiny bit.
I let the blocked body dry out and settle in for several weeks - kept it in a dry place in my attic. The picture below shows all the blocking done, with a smear of wood filler over the boundaries before I began sanding to level the entire top.
Once the top was level and smooth - I marked out the location of the pickup route and the control cavity, to try to return them to as close to the original configuration - and then routed these out.
Now the body was looking pretty decent - and though the blocking and glue had added some weight relative to an all original body, the body was still lightweight at 4 lbs, 10 oz. I then stained the body back to the original yellow and sealed the stain with a coat of vinyl sealer (similar to the Fullerplast sealer Fender used in the 60s). The picture of the butt end of the bass body shows some remnants of the original yellow stain.
Next came a coat of white lacquer primer - followed by a little glazing putting in the remaining rough spots - some wet sanding - and another thin coat of white primer.
Now the body was finally ready for the color coat. I used ReRanch's Sea Foam Green nitrocellulose - which comes in high quality spray cans - it typically takes about 1 1/2 cans to do an entire body . The color went onto the white primer beautifully - and looked gorgeous even before wet sanding and clear coating. Notice how my flash photos make the color look almost like Daphne Blue, whereas other colors show of the green tint more.
After several rounds of wet sanding and color coats - the body was clearcoated - without any tint - and then buffed out to not-too shiny finish - I didn't want it to look brand new. The neck was bolted on - and this is when I realized that this WAS a late 66 body to match the neck - because the neck was exceptionally wide at the heel - and didn't fit my earlier 66 or 63 P-bass - but fit the body I had redone incredibly well !! And one the bass was strung up - I just had to file three frets at the high end of the fretboard and the bass played beautifully all the way up and down the neck - no need for a refret for at least another decade or two !!
Here is the completed bass - just before its trans-Atlantic trip to the land of Fjords and Viking-rockers !!
read more →
Subscribe to:
Posts (Atom)


