Precision Bass History
The 3rd generation Fender Precision Bass was introduced during 1958 and established what most of us know as "the P-bass". More than 50 years later, Fender is still making the Precision Bass with no significant changes - "if its not broke, don't fix it".
The first generation Precision came out in 1951 and was a simple instrument in the vein of the Fender Broadcaster/Telecaster guitars that Fender had debuted a mere two years earlier. The body was slab of ash, with a one-piece maple neck, a simple single-coil pickup (more or less a 4-pole piece version of the Telecaster guitar's bridge pickup) and a very simple two-saddle bridge. The headstock shape was similar to that on the Telecaster guitar as well - just scaled up to fit four big Kluson bass tuners.
The second generation Precision had a similar body profile, but instead of slab body incorporated the front and back contouring and scoops that had been introduced on the Fender Stratocaster guitar in 1954 - the edges of the Precision body was also rounded with a much larger radius - making bass more comfortable to play, since the back edge wouldn't dig into the player's ribs and the upper front edge wouldn't cut into their forearm. The contours also shaved some weight off the body. The bridge, pickup and other hardware remained generally the same, as did the maple neck.
The 3rd generation Precision had the most changes and established the blue-print for the Fender P-bass for the next 50+ years. Perhaps the most significant change was to the pickup, which now took the form of a staggered two-coil humbucker, which had a very different sound from the old single-coil design. The bridge, while still very simple, now had separately adjustable saddles for each string allowing for better intonation. The anodized aluminum pickguard acted as a mount and shielding for the electronics, which combined with the humbucking pickup made the instrument much less prone to stray electronic noise. The body was essentially the same as the 1954 version, though the new pickguard gave it a different appearance. The neck was different in that it now incorporated a headstock more like the Stratocaster guitar rather than the Telecaster was also slimmer in profile (front to back) - though Fender's from the era do vary from instrument to instrument.
'59 P-bass from Idaho
So onto the subject of this post - which is a 1959 Fender Precision that has a good 50+ years of play under its belt - and a number of refinishes as well. The bass belongs to a client in Idaho, who acquired the bass, pretty much in the condition seen below, roughly 20 years ago.
He had always intended on refinishing the instrument, but had just never gotten around to it. However, through a combination of fret wear and nut wear, the bass had slowly become unplayable and he finally contacted me around the middle of last year (2011) to see if I though it was possible to restore his bass - and of course, if it was affordable.
He sent me a set of pictures - some of which are below. Cosmetically, the biggest issue was that the bass had been stripped, stained and then BRUSHED with some sort of shellac (see the second picture). The gold anodized aluminum pickguard had also been spray painted black and then back of the neck had been sprayed with some sort of clear finish as well.
Functionally, the biggest issue was that the frets and neck had been worn deeply in a few positions - namely the 3rd, 5th, 7th and 9th position. As the owner said, "the cowboy chords" !!
I told him I'd most likely have to do a partial or complete refret but try to save the original finish on the fretboard - and that I'd try to strip the body clean for a 2-color burst, but that if it didn't come out clean, we'd have the reversionary option of a blonde finish.
On the plus side, it appeared that ALL of the hardware was original with the exception of the bridge cover and a few missing pickguard screws.
 |
| Really ? Someone thought black Krylon looked better than anodized gold ? |
 |
| Gotta love those stained scratches and brush marks !! |
 |
| Heavy playing wear at the "dots" !! |
I received the bass and after inspecting it, I wanted to see if I could at least get it playable. The strings were more or less sitting on the frets and I suspect that the owner had inadvertently switched to a lighter gauge set of strings which effectively made the nut slots too low and the neck tension too high.
I built up the nut slots with some baking soda and superglue and then refiled them to a better height and width. I also loosened up the truss rod a little - fixed a loose ground - and then bass played! The action was SUPER low, but at least now it was working. The first 10 frets were VERY worn and grooved whereas the higher ones weren't grooved at all!
I then started the disassembly to see what I had to work with. The first obstacle I ran into was that the neck was STUCK to the body - and I mean literally stuck - like it was glued in !!
I tried just prying it loose at first - but I was worried about either ripping a chuck out of the softer alder body - or even worse, damaging the neck !!
I ended up working a very thin palate knife between the body and the neck - the neck still wouldn't come loose, so I stood the bass on end and dripped denatured alcohol into the small gap using a small paint brush. After doing this several times and waiting a few minutes - I then used my hands to try to pry the neck loose - and "POP!!" - out it came !!
Once the neck was out, it became obvious what was holding it stuck in place - the remnants of a lime green paint job that had gotten softened by the prior stripping and then acted as a glue to hold the neck in place.
What's really horrifying is to imagine this '59 P-bass sprayed lime green - presumably sometime during the early 80s ...
Remarkably - the penciled neck date DID survive all of this - and sure enough, read "2-59" - February 1959. The pickup cavity had a different date - "12/58" - which is not unusual for Fender instruments, since they are essentially modular - and were assembled from a stack of bodies and necks and other hardware, with the dates usually ranging over a few months.
Next came the stripping process - to assess whether or not the factory 2-color sunburst would be feasible on the stained body. I decided to use my random orbital sander, a palm sander and a sanding block to remove the finish as I was worried a chemical stripper might actually soak the stain further into the wood. I started with relatively heavy 150 grit disks to cut down the brushed on finish, and then switched to 220 grit and 320 grit disks.
With the palm sander and sanding block I used 100 grit and 220 grit, plus some free hand sanding in places like the inside of the cutaways. I wanted to get rid of the stained scratches but of course not remove a noticeable amount of wood. In the end, the stain was only on the surface of the alder body and came off remarkably cleanly!
Traces of the original finish could be seen in the pickup and control cavity routings.
The pickguard was also stripped - using Citristrip paint stripper - which took the black paint off cleanly, requiring only a plastic scraper and then a rag soaked in acetone to get it completely clean.
 |
| Stripped guard - showing player's wear through to aluminum. Partially defretted neck at top. |
I also carefully removed the first 10 frets - taking care to not chip the fretboard or finish as I pulled them.
Based on the results of the stripping, the client and I decided that a 2-color burst was the finish to go for and then I'd also refinish and somewhat "relic" the back of the neck, but leave the original finish alone on the fretboard and definitely on the headstock face (the logo was in surprisingly good condition!)
The 2-color burst is a little bit of a tricky finish - because though its just two colors, it can often look like a faded 3-color Fender burst - especially given the inconsistent reproduction of colors in some guitar books. The client and I searched the internet for various original 1958 and 1959 P-basses and also pictures of Fender's recent custom shop reissues. After agreeing on a few images I set about trying to reproduce the finish.
The base finish is a transparent ambered yellow - with a decidely more "orange" tint that the strong lemon yellow transparent color that serves as the base for a later 3-color burst. I also had some remaining finish in the body routings to refer to.
The dark edging is a fairly transparent dark brown, with a reddish element mixed in - which looks very red when it is "misted" over the amber base coat - thereby giving the impression of a soft 3-color burst.
Some of the ambering of the base color is from aging of the clear coat, so I decided to mix a base color from Stew-Macs "vintage amber" and "lemon yellow" dye and then a second base color that had more "vintage amber" and a tiny dab of "cherry".
For the edging, I mixed Stew-Mac's "medium brown" with some "cherry" and then a little "walnut" to darken it up more. I mixed this so that it would require several passes to get an opaque color - so that I'd be able to get the soft fade of the edge I wanted.
Before I started painting, I sealed the body with multiple coats of sanding sealer and sanded it, to get a smooth base to work from.
I then sprayed the more yellow base coat to get an even tint across the whole body - and then applied a coat of the more ambered color to darken it and give it more depth.
I switched to the brown edging color, first doing the edges of the body, and then working on the fade - trying to avoid the tendency to apply TOO much of the darker color. After carefully "dusting" off overspray dust from the center of the body, brushing outwards with my hand, I sealed the finish with a single pass of clear.
 |
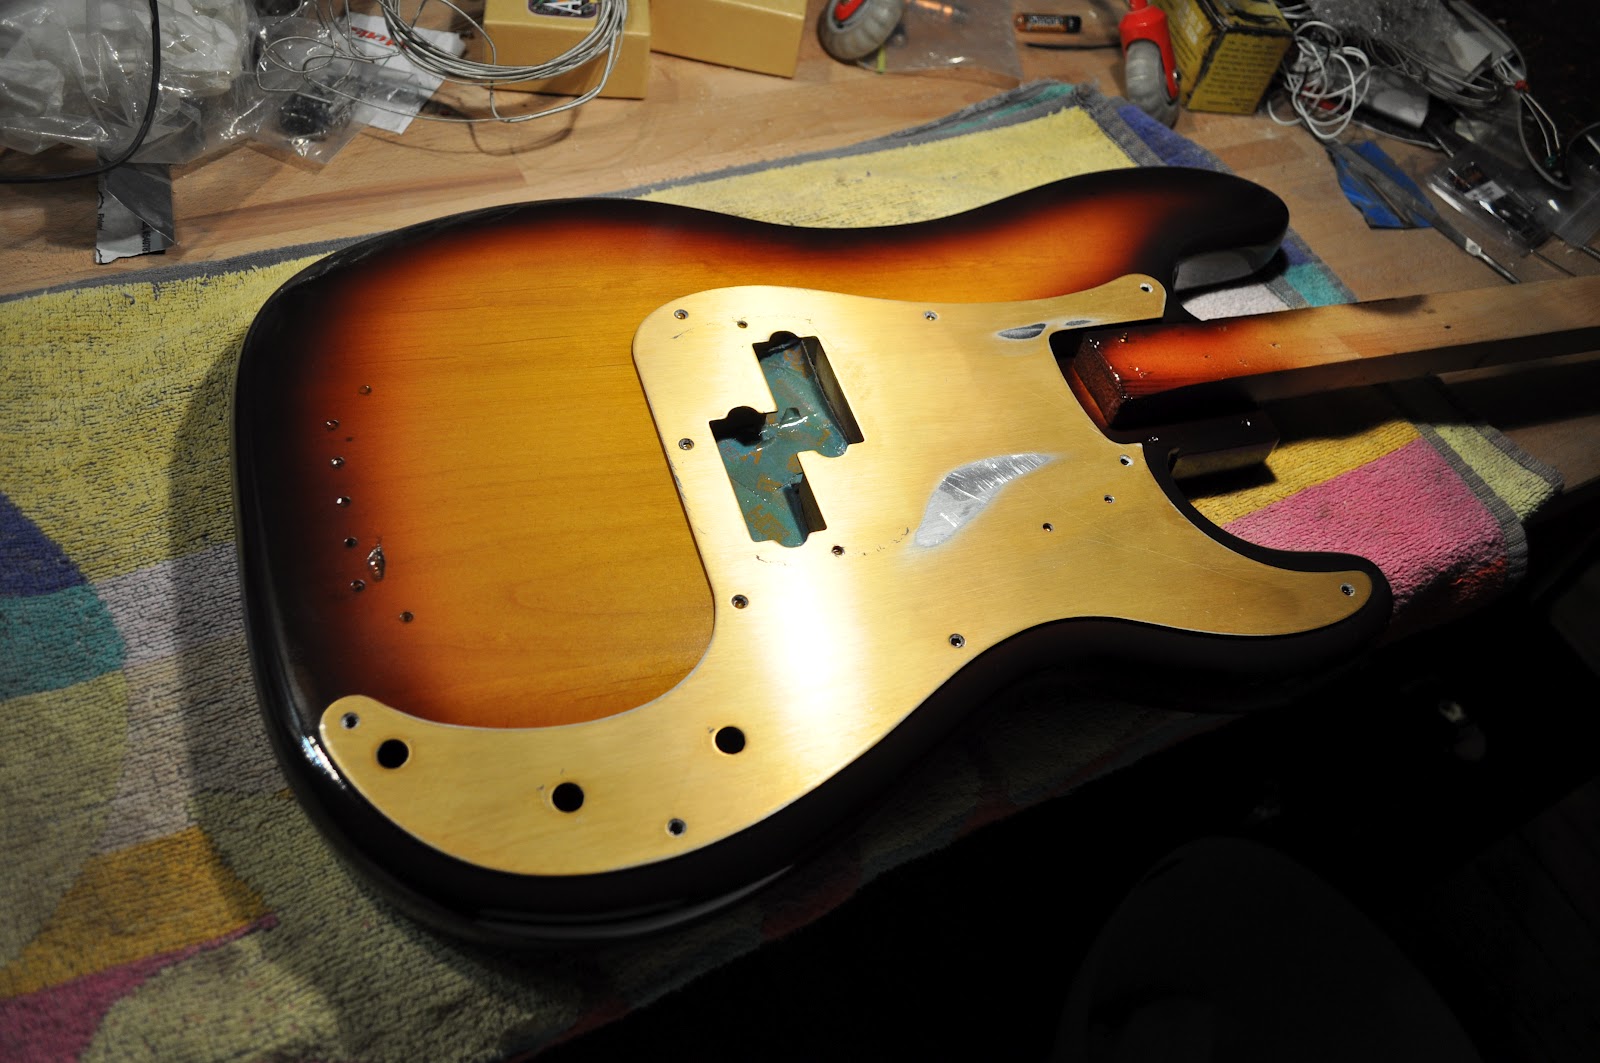
| First pass of 2-color burst with guard in place |
 |
| Notice blushing, which appears pinkish |
I liked how the finish was looking, but it was too transparent on some of the edges, particularly around the horns of the body and there were a few areas that the fade needed to be a little wider - and there was also what appeared to be some "blushing" in the darker areas.
I realized the blushing was from the using too much "Smoothie" additive in the clearcoat and the brown tinted portion of the finish.
I mixed a new batch of the brown edging, but without Smoothie and tinted a little heavier - and did a very light overspray of the edging - evening it out in the process as well.
I also sealed this with several coats of clear gloss - and I was very happy with the results !
I also unmasked the control and pickup cavities, and the new finish matched the remnants of the old finish almost perfectly !
While the finish on the body was curing - I turned my attention to the neck. I refretted the first ten slots with narrow "vintage" fretwire, but the new frets were still substantially taller than the 53 year old original frets, probably more due to wear and dressing than a difference in size.
When installing the new frets, I was very careful in cleaning out the fretslots and not overcutting them. Even though it would be pretty obvious that the neck had a partial refret, I didn't want it to be TOO glaring !! I also made every effort to not damage the original finish on the fretboard. I trimmed the fret-tangs to the correct length for each fret before installation (using the Stewmac fret tang trimmer) - and then applied a small amount of glue to the tang before gently hammering them in and then clamping each fret til it dried.
Once the frets were all in - I had to level the first ten down to the level of the remaining original frets - which meant just going slow. I used a radiused sanding block with 80 grit Stickit paper on it to do the rough leveling - then switched to a finer grit before working on each fret individually.
The fret ends on the treble-side of the fretboard were particularly difficult to do in the areas where the wood was heavily worn. I didn't want to over file - but I also didn't want sharp edges to snag fingers. I ended up putting a small drop of thick cyanocrylate glue under the tip of the frets that were protruding (3 of them) and then gently and subtly rounding off the fret ends til they were comfortable. The little bit of glue under the end of the fret keeps the players fingers from snagging the bottom edge of the fret (where it SHOULD be meeting wood if it weren't worn away!).
All in all - I was happy with how the fretboard felt and looked when I was done.
I had already sanded the back of the neck bare - I even had to dip the tuners in acetone to strip shellac off them - someone had simply sprayed the whole back of the neck, with the tuners in place !! No wonder they were stiff !!
I did a multistep finishing process here:
- a clear gloss coat to seal the wood
- a tinted amber coat (a mix of Vintage Amber and some Brown dye)
- then I lightly sanded the finish and rubbed it with a water/pumice mixture
- I rubbed in a mix of black and burnt siena powdered dye
- sprayed another light clear coat
- dulled the clear coat with water/pumice mixture again
I probably could drop or combine a few steps here and there, but this allowed me to progress towards the look and feel I wanted. I have a '65 Jaguar with perfect neck wear and one day I hope to be able to replicate that finish !
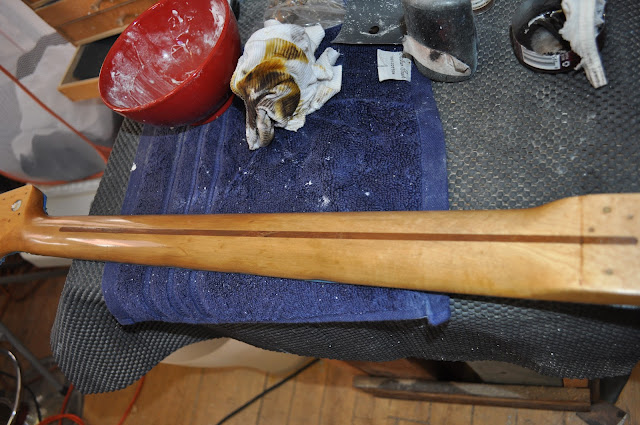 |
| Pumice/water in red bowl - powdered stain in cut tin can to right. |
Finally came the time for wet sanding and buffing out the body - and reassembly. And here are the final results !!